Welcome to Day 6! We're halfway through the series. I have to say I have a huge amount of respect for the people who do video tutorials on a regular basis! All this video editing takes a ton of time! :)
This ornament features some A Muse Studio products from the Holiday Catalog that I'm totally in love with, plus everyone's favorite technique - emboss resist - used in a whole new way. It gives a really fun look that's sort of like pickling (a wood finishing technique, also known as "whitewashing," that can be done with white or colored stain).
Enjoy the video and let me know if you have any questions!
Supply List:
(all A Muse Studio products are available in my webstore) - Snow Crystals stamp set by A Muse Studio - 1.5" Maple Tags by A Muse Studio - Twas the Night Before Christmas cardstock by A Muse Studio - clear embossing powder - Distress Ink in Fired Brick - Distress Stain in Peeled Paint - Glossy Accents - Scor-Tape - heat tool - VersaMark ink - Martha Stewart Crafts Scoring Board
OK folks, go round up the kids! I included this ornament specifically because it's way more crafty than artsy and it's perfect for a family project. This little dude is so cute and so crazy easy to put together!
Oh my goodness, isn't he just so cute! And buttons are really cheap - just head to your local Joann Fabrics and grab a bunch of buttons... I even found at my local Joann's - get this! - a big bag of "craft buttons" in black and white and tons of different sizes. It was less than $5 and would probably be enough to make about three of these snowmen.
I hope you enjoy the video below. See you tomorrow for Day 6! :)
I'm home from work today with a particularly angry cold, so my big kitty Ezra and I are snuggled up on the sofa with QVC on in the background, working on getting a bunch of blog posts ready.
Today's ornament is one that's been in my life for as long as I can remember, but I don't think I actually made any myself until last year. These little faux cookies are such fun to make, and they will look and smell amazing for years to come!
** Just one little disclaimer: These are "edible" in that they will not hurt you if you, your kids, your dogs, or your cats eat them. (Just in case you don't believe me, the ASPCA website says cinnamon is non-toxic for dogs, cats, and horses!) But they're not meant to be eaten. So, please, just don't eat them! :) **
Old-Fashioned Cinnamon Cookie Ornaments How-To:
Mix 1 part applesauce (get the cheapest one you can find) with 1 part ground cinnamon. (We're lucky enough to have the Atlantic Spice Company about a half an hour away from us, so we can get a whole pound of cinnamon for well under $5. But if you're looking to make a bunch of these ornaments, check your local markets to see if any of them offer bulk herbs and spices.) Mix with your hands if neccessary to achieve a thick cookie dough consistency. Sprinkle some cinnamon on a wooden board, and roll out dough to desired thickness (1/8 to 1/4 inch). Use cookie cutters, or trace templates with a butter knife, to cut out desired shapes. Use a toothpick or plastic drinking straw to cut holes for hanging. Place ornaments on parchment or wax paper lined trays or cookie sheets. Place in a dry area of your home and allow to harden, flipping occasionally to allow for complete and even drying. Hang ornaments on pieces of twine or ribbon.
I've also got a quick little video for you today, with some tips on finishing off and personalizing your ornaments.
P.S. The snowflake stamp I use in the video is from the A Muse Studio Snow Crystals set, which is available in my webstore.
AND - just one more idea I recently found on Pinterest via Martha Stewart... Consider using these little ornaments as gift tags! How cute! :)
See you tomorrow for Day 5! Heads up - it's a great idea for the little ones in your life!
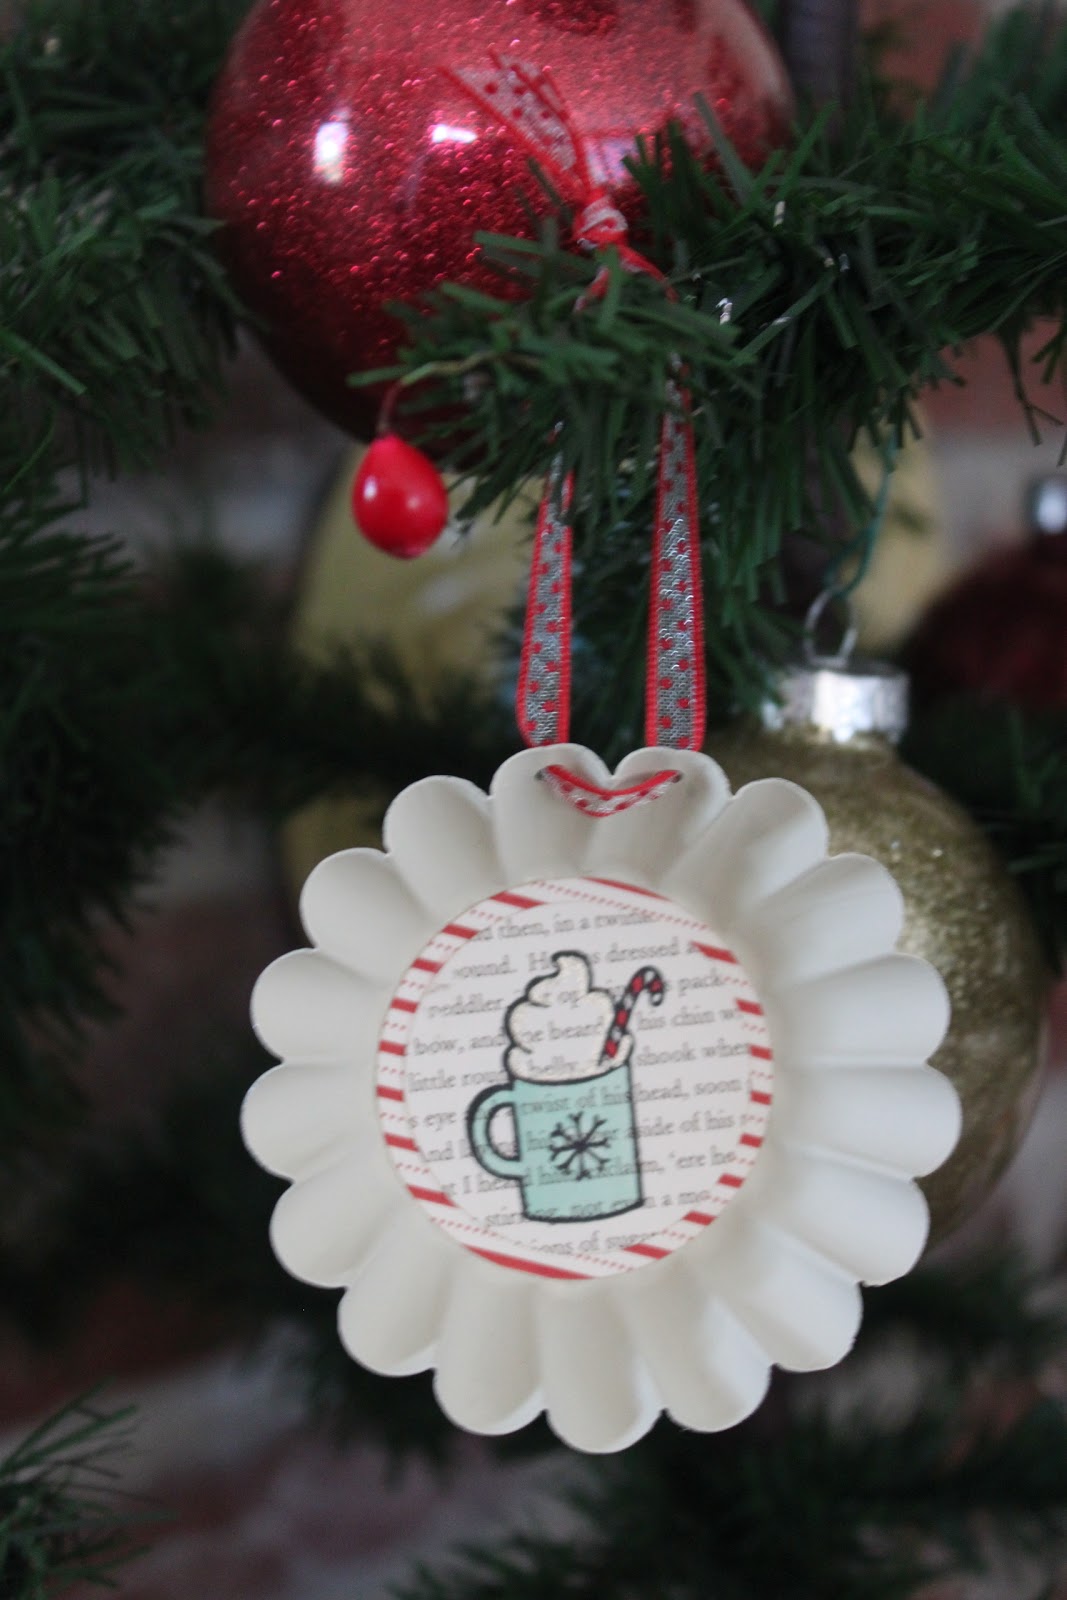
Today's ornament was inspired by a project by Ranjini Malhotra for Jenni Bowlin Studios that was featured in Better Homes and Gardens' Holiday Crafts magazine. (If you see this magazine on your local newsstand, I highly recommend you pick it up!)
Here's the ornament I make in the video...
And here are a couple more I made with other stamps from the same stamp set...
I hope you'll enjoy the video tutorial below, and be sure to let me know if you have any questions!
Supply List: (all A Muse Studio products are available in my webstore) - Holiday Tags stamp set by A Muse Studio - A Muse Studio cardstock in Twas the Night Before Christmas, and Candy Cane Stripe - A Muse Studio Polka Dot Organdy Ribbon in Cherry - Stampin' Up Classic Ink in Pool Party and Real Red (if you don't already have a SU! demonstrator, my friend Jen is an awesome one!) - StazOn Ink in Jet Black - water brush - Crop-a-Dile - vintage tart tins (check ebay, or you can get the vintage-look tins from Jenni Bowlin - off-white acrylic paint - tape runner adhesive - Tombow Mono Multi Glue
Welcome back! Today's project is my favorite, I think. It's a little involved, but the end result is SO worth it. (I hope you'll agree!) I am so madly in love with felt right now, and the A Muse Studio felt (available in my webstore!) is just so awesome, so I wanted to design a project to really show it off.
(A huge thank you to Sarah R. for allowing me to use a photo of her adorable daughter!)
Check out the video tutorial below and please be sure to let me know if you have any questions!
Supply List: (all A Muse Studio products are available in my webstore) - A Muse Studio Felt in Sky, Sage, and Vanilla - A Muse Studio Small Mitten Die
- A Muse Studio Snowflake Trio Die Set
- A Muse Studio Clear Twinkle Stickers
- Beacon Adhesives 3-in-1 Advanced Craft Glue
- ribbon
Thanks for joining me today. See you tomorrow for Day 3! :)
Welcome! Today is the first day of my 12 Days of Christmas Ornaments tutorial series! This series will bring you a new Christmas ornament idea each day for 12 days in a row, and will feature 11 video tutorials. I'm so excited to share this with you, and I hope you'll be inspired to make new ornaments and holiday memories with your family!
For Day 1, I'm starting off with a real classic that is easy and fun to make, and super customizable... The Glittered Glass Ball.
Cheap and cheerful is my goal and you can make these for well under $2 each. I love the idea of visiting friends and family around Christmastime and sneaking ornaments onto their trees - and this is definitely one you can make in bulk! Hope you enjoy! :)
Supply List:
- fillable glass ball ornaments (found at local big-box craft store)
- Beacon Adhesives Glitter It!
- Martha Stewart Crafts Fine Glitter in Carrara Marble (you can use any color you choose)
- A Muse Studio 1/4" Polka Dot Organdy ribbon in Cherry
- 1/2" silver jingle bells
I hope you had a lovely Thanksgiving yesterday. Please join me tomorrow for Day 2's ornament! :)
Well, I guess it's safe to say I'm still obsessed with watercoloring! :) I used a really fun technique (that you probably remember from elementary school!) to make this tag, featuring Papertrey Ink's Star of Wonder stamp set, and Limitless Layers and Tag Sale 5 die.
Then I made a whole bunch more, and created a fun little tin to put them in for a special little pre-Christmas gift idea. Check out the video below to see how I did it.
Hope you have a great Thanksgiving tomorrow! Make sure you eat enough pie! :)
I don't have a dryer in my house, so we usually use the clothesline, even in the winter. But recently my husband took a few loads of wash over to my parents' house to dry. My mom ended up doing most of the loads, and even folding our clothes! And, of course, she does a way better job than I do! ;) So I thought it would be fun to send her a silly little thank you card in the mail. :)
I'm torn between being excited that Christmas is coming, knowing I have a lot to do to get ready for it, and trying to focus on fall and Thanksgiving and not to rush through my life. Plus, the past few years Christmas has ended up being really disappointing, I think in part to getting too excited too soon.
But anyway, I digress... Christmas is coming, and I have a craft fair in two weeks (eep!) and some awesome things planned for the old blog-o. So without further ado, here's my first official holiday card share of 2011! :)
This card is 100% A Muse Studio. I'm pretty sure blue (preferably sky blue or aqua), red, and white is my favorite color combination for holiday projects. I also love the idea of using non-Christmas stamps for Christmas cards. For the focal image on this card I combined the cute mug image from Love Conquers All and combined it with a sentiment from Mini Holiday Messages.