In memory of her grandmother and in honor of all those whose lives have been touched by Alzheimer's, Carolyn (aka Cammie) King has organized a card drive to thank all the amazing people who provide care and services to Alzheimer's patients and their families. I urge you to visit Miss Cammie's blog for all the details on how to participate in this wonderful cause. And be sure to read carefully - the instructions are pretty specific but if you follow them you will be entered to win an AMAZING and HUGE prize package from some very generous folks including Gina K., I {Heart} Papers, Papercrafts Magazine, My Favorite Things, Spellbinders, and so many more you won't even believe it!
This was a call-to-action that inspired me to get up off the couch right away. Here are my two cards.
This card will be sent to The Artman Lutheran Home in Pennsylvania and the staff that took care of Cammie's grandmother. I have written them the following note: "We may have never met, but please know how far-reaching your thoughtful, caring, and diligent work is. Thank you for all that you do day in and day out. You touch so many lives."
I will be sending this card to Alzheimer's Services of Cape Cod and the Islands, my local Alzheimer's care coordinator and provider, and formerly the Cape Cod chapter of the Alzheimer's Association. Here's what I've written to them: "I have not been directly touched by Alzheimer's, but many people I know have had their lives irreversibly changed by this disease. It is because of them that I write today to thank you for your kind and diligent work helping the families of Cape Cod. I was inspired by Carolyn King of Pennsylvania, who has urged all of her blog readers to send a hand-made thank you card to Alzheimer's caregivers. Please know your work is appreciated by many." (I also wrote out Cammie's blog address so they can read more about her card drive.)
Please, please check out Cammie's blog today. This is a wonderful cause, so please get involved!
a little blog about fabric, paper, food, and family.
set in the charming Cape Cod town of Brewster.
perpetually covered in cat fur.
Sunday, September 26, 2010
Thursday, September 23, 2010
StampTV Thursday 9/23 Sketch Challenge
So I don't know what it is about the StampTV sketch challenges. I follow several sketch blogs, and so very rarely do anything with the sketches. But this is the third consecutive Thursday I've participated in the StampTV sketch challenge. I think I like that they never have any fussy aspects that I don't know how to execute. And this week's challenge? Oh my goodness! Vicki read my mind! Totally my go-to card layout. I mean, probably 90% of the cards already in my StampTV gallery could apply to this challenge. On the one hand, I was psyched that I could use a card that's been in my head for a few days without any real changes. On the other hand... well... I'm feeling pretty lame for making the same card over and over again! :)
Anyway, here are the sketches... there's one CAS/Beginner and one Layered/Experienced. My card is somewhere between the two.
And here's my card...
Supplies: Cardstock - Stampin' Up (kraft), Pure Luxury by Gina K. Designs (Rocket Red); Patterned Paper - Kaisercraft Be Merry collection; Stamps - Gina K. Designs (Vintage Borders by Nina Brackett, Blessed is the Season); Inks - Vivid Brick Red, Versamark; Misc. - Stampin' Up embossing powder, cheapo rhinestones from AC Moore
Wednesday, September 22, 2010
horn of plenty
Just one more quick post today to show another card I made with Lawn Fawn's Harvest Season. I didn't think about this card at all while I was making it, and I was pleasantly surprised to see that the stamp set I recently lauded for its whimsy can also be used on really elegant cards :)
Happy 'Hump' Day!
Happy 'Hump' Day!
this technique is brilliant!
When I saw the card sample for the latest StampTV episode, I literally could not imagine how on earth the background paper had been made. Turns out it's super easy! I was so psyched to try it. Check out my card...
I only have a handful of distress inks, so I couldn't necessarily do exactly what I wanted. I chose Dried Marigold and Peeled Paint because I thought they would give a similar contrast to the combination in the video, as well as blend into a nice dried leaves orange-brown color.
And here's the video, so you can try it too! :)
Distressed Stripes from StampTV on Vimeo.
A couple tips I picked up while doing this technique for the first time:
- Do use heavy-weight cardstock like Gina says in the video. If you use a light weight cardstock, it will get soggy from all the ink. I used 80 lb. Pure Luxury cardstock, and it worked just fine, but I had to be really careful when I was scoring because the cardstock was pretty saturated.
- It's really easy for your stripes to get lost in too many layers of ink. Try to only go over the last stripe or two each time, and start really slow. I pounced off a lot of the ink onto scratch paper before I inked my cardstock. You can always add more! :)
- I only have one Ranger ink blending tool and two foam pads, and they both have other colors on them. So I used some large sponge daubers. They worked well, but you really have to be sure to start off the paper or you'll get round splotches of darker color.
Oh, and did I mention how much I love that new StampTV episodes are posted on Wednesdays? Now I have something awesome to look forward to that can tide me over between Kristina's Make a Card Monday and Finally Friday videos! :)
Tuesday, September 21, 2010
squash!
Hey everybody! Just a super quick post today to show you this card I made with my *first ever* purchase from Lawn Fawn! Their latest release was just irresistible! And these stamps are amazing in person.
I bought two of the three sets from the new release. This card uses Harvest Season, which is so adorable. I LOVE this cornucopia! My one complaint (sorry Kelly Marie!) is that I can't really tell what some of the vegetables are supposed to be, exactly. But I decided they're various types of squashes and colored them accordingly. ;) I love how perfect this set is for coloring, but it's really fun and whimsical, which is awesome because I don't have the skills or marker selection to make things look super realistic!
I haven't busted out the Christmas set yet - but I promise you'll be seeing it here very soon! :)
Hope you had a happy Monday!
ETA: Haha, it's totally Tuesday! I really had no idea! :)
Supplies: Cardstock - Pure Luxury by Gina K. Designs (white), Stampin' Up (yellow, kraft); Ink - Versamark, Colorbox Chalk in Chestnut Roan; Stamps - Harvest Season by Lawn Fawn; Misc. - Labels 8 dies by Spellbinders, Stampin' Up clear embossing powder, Pure Luxury by Gina K. Designs ribbon, Copic Markers, 3M foam adhesive
I bought two of the three sets from the new release. This card uses Harvest Season, which is so adorable. I LOVE this cornucopia! My one complaint (sorry Kelly Marie!) is that I can't really tell what some of the vegetables are supposed to be, exactly. But I decided they're various types of squashes and colored them accordingly. ;) I love how perfect this set is for coloring, but it's really fun and whimsical, which is awesome because I don't have the skills or marker selection to make things look super realistic!
I haven't busted out the Christmas set yet - but I promise you'll be seeing it here very soon! :)
Hope you had a happy Monday!
ETA: Haha, it's totally Tuesday! I really had no idea! :)
Labels:
cards,
Copics,
fall,
holidays,
Lawn Fawn,
Spellbinders,
stamping,
Thanksgiving
Monday, September 20, 2010
cue the blooper reel!
Friday, September 17, 2010
StampTV Thursday Sketch 9/16
Here's the sketch for this week
And here's my card using my new Hero Arts goodies that I picked up yesterday from my LSS! :)
And... Here's another variation that I made for the Hero Arts September Challenge Contest. This is more like what I wanted to do with the square card, but I couldn't figure out where I could make room for the sentiment.
Isn't that patterned paper great! It's by Moxxie. The other side is a really pretty yellow and orange with branches and falling leaves. It will definitely make an appearance soon! :)
Oh, and in other news, while DH and I were in the "city," we bought a futon! It's a really high-quality, pocketed coil innerspring mattress - not like the junky ones you find in dorm rooms :-P We're not going to use a frame - just sleep on the floor à la Japanese. We'll probably be picking it up this weekend or early next week! :) Not sure what we're gonna do with the bed we currently have... The box spring and bedframe are perfectly fine, I'm sure, though the mattress should probably just be chucked. Technically, though, it all belongs to my parents, so it's up to them what we do with it!
Have a good weekend!
Thursday, September 16, 2010
{}
(I'm sorry, I just can't think of a good title for this post!)
I've got two cards to share today that I made with the new StampTV kit, Autumn Splendor. I'm really loving it ... been sitting in my living room watching TV (I'm obsessed with Ghost Whisperer... just started the *last* season) and working on Copic coloring a bunch of images to have on hand. These cards are roughly based on Laura's Sketch 60 from 2 Sketches 4 You.
Tomorrow's Friday! Yay! Have fun! :)
I've got two cards to share today that I made with the new StampTV kit, Autumn Splendor. I'm really loving it ... been sitting in my living room watching TV (I'm obsessed with Ghost Whisperer... just started the *last* season) and working on Copic coloring a bunch of images to have on hand. These cards are roughly based on Laura's Sketch 60 from 2 Sketches 4 You.
(The sentiment says Happy Harvest. It's easier to see in person.)
Tomorrow's Friday! Yay! Have fun! :)
Sunday, September 12, 2010
Sunday Faves
Hey all!
Just a quick post to share a couple of the things I'm loving right now... Depending on how life goes, this may become a regular feature... We'll see!
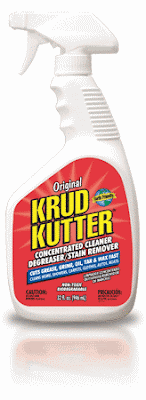
And, let's kick off the list with... Wait, a cleaning product?? I know, I know, what am I thinking, right? Well let me tell you... It's cleaning time at the café where I work and the boss grabbed some random cleaning products at Home Depot recently. (She's really into the "all natural" cleaners, but she knew those of us who would actually be doing the scrubbing... think layers and layers and layers of built up greasy/waxy residue... would want some chemicals!) This Krud Kutter stuff is so amazing I literally couldn't stop waxing poetic the entire time I was using it. I kept saying I wanted to find out the parent company and buy their stock; that they should feature me in their next commercial campaign; etc. Really. Give this stuff a try.
(I'll try for a better photo soon!)
I bought this awesome scarf at Old Navy last night, and I'm wearing it today. LOVE the mix of orangy-coraly-red and magenta! And it's so soft, and the perfect length to wrap it a bunch of different ways. There were more color ways but this one is definitely the best. :) It doesn't seem to be available online, though. Oh, and I also grabbed these skinny jeans... Super comfy and super flattering (... and btw, I wear a size 14! Skinny jeans ain't just for skinny girls, my friends!)I've been doing a lot of Copic coloring lately and I'm obsessed with my YR21 (Cream) marker! I only have a basic "beginner's" selection of Copics, and a lot of them are quite bright colors. Since I'm coloring fall images, I've needed to find a way to tone down the colors a bit. This marker is the solution. I literally color YR21 over the entire image, and then go over with the colors I want for the image. Sometimes I go back and do a little blending with YR21 too.
I read this book ages ago. It's absolutely a must-read for anyone who has anything to do with children. (I went to school for teaching, btw.) It's snarky and well written and will make you really PO'd and all fired up to create positive change at the same time! But I'm sharing it today because I'm currently loving the author's blog and twitter... She's constantly linking to articles and websites about Free-Range issues. It's really worth checking out.
Thursday, September 9, 2010
StampTV Thursday Sketch Challenge
I was checking my email and facebook while I was tying my shoes to get ready for work this morning, and I saw today's Thursday Sketch Challenge at StampTV. And get this - It was pretty much the card I was planning to make this afternoon anyway! Last night I sat around watching Ghost Whisperer and I colored the flowers from the Autumn Splendor stamp set. And this afternoon I came home from work and made a card based on the sketch... I just had to slightly tweak what I was planning to begin with :)
So there are things I like about this card, and things I don't like. I totally meant to emboss the larger yellow layer with the Swiss Dots Cuttlebug folder - but I forgot! :( I really think it would have made the card more complete/polished, but I'm over it. (Not really, actually.) I'm not thrilled with my ink sponging - I mean, look around the stems of the flowers! Eugh. I think it's gonna take some practice at the finesse of sponging, and maybe sponging off a little more of the ink on the scratch paper first.
But, I've got to toot my own horn for a minute here... I am so proud of the coloring on this project (which kinda makes me a little bit more upset about the crappy sponging). But seriously, I'm pretty sure this is the best Copic coloring I've managed to date! :)
So there you have it. Ooh, wouldn't it be fun if I won? :)
Thanks for stopping by!
Wednesday, September 8, 2010
Autumn Splendor
This afternoon I broke out the newest Gina K. Designs/StampTV kit, Autumn Splendor. It's super fun: a stamp set that's twice the size of what usually retails for around $25, tons of colors of coordinating cardstocks in different weights and a couple textures, a few feet of each of a bunch of ribbons that coordinate with everything, and a whole mess of brads and eyelets! I don't really know what to do with eyelets, but the colors on these puppies are so awesome, so I've gotta figure something out. My only warning: total enabler alert with this kit! There are only 2 sheets of most of the cardstock colors - so if you're doing stamping/layering cards a la Gina K. or Stampin' Up, you pretty much get 2 cards out of 2 sheets - And I already want more, More, MORE!! :)
OK, so I've been dying to do this embossed "painting with bleach" technique ever since I watched the video. But the waterbrush that I bought on ebay 2 weeks ago still hasn't come. So I decided to use the "bleach as a stamp pad" technique.
This technique is soooooo addictive! It's so much fun to not really know what color the cardstock is going to bleach to, and then to watch it slowly lighten and change after you've stamped.
This card is pretty much CASEd from Gina K.'s bleached leaves card (linked above) - measurements and all! :) Except I chose another sentiment and only used 2 colors of cardstock. Oh, and I actually looked up the author of the quote this time! ;) Wilbur D. Nesbit was an American journalist and poet. He was also a Mason and seems to have been pretty into that, judging from this poem.
Here's another piece of background paper I made with the brown cardstock.
This card was done using emboss resist with clear embossing powder on yellow cardstock. I love the sentiment and the fonts!
Tuesday, September 7, 2010
a different spin on Halloween
from the Sept./Oct. 2010 issue of Paper Crafts Magazine
Monday, September 6, 2010
Life is Good
Actually, right now I'm feeling like my life is pretty mediocre. I am really craving a change, and I think it's going to have to be in the job arena. I mean, let's face it, at work is where we spend the most hours of our days. I need something more mentally stimulating that gives me meaningful and valuable challenges to solve. I'm fully aware that there are worse things I could be doing than making cookies and pizza dough every day, but it's just downright boring. I have an interview for a part time job on Wednesday... it's not exactly in line with the "career path" (I went to school for teaching), but it is at a school! MY school in fact - the Cape Cod Lighthouse Charter School, where I went to middle school. It's a 3-4 day per week office assistant position, and I think I could really enjoy it. HOWEVER, I'm also aware of a long-term sub spot opening up soon at my elementary school, and I was in touch back in the spring with a local doctor about working as a medical assistant or in the office at his practice. So I'm torn, and I might have to make a decision to consciously abandon the chance at something better in order to not pass up a guaranteed opportunity. Scary.
But anyway, I was actually referring to the Life is Good collection by Echo Park :)
I actually pre-ordered this collection from StopAndScrap.com ages ago. But to save on shipping I combined the order with my pre-order for October Afternoon's Seaside collection. They were supposed to ship at about the same time, but I just got them yesterday. I've been pre-ordering everything on my CHA list from StopAndScrap.com because it satisfies my OCD/paranoid tendencies. (ie: Once I see a new collection I know I'm going to want, I think about it obsessively until it is available and I get completely paranoid it's going to sell out before I get it. Yes, I'm crazy, I know!) I do save a couple dollars per order, but they end up shipping items weeks after they're available (shipping immediately) on Two Peas. So there are some pros and cons.
OK, that's enough of that! :) Onto the projects...
This is the card I made for my friend's older sister's daughter's first birthday. I wanted to make something girly, but not baby because, really, a baby's first birthday is more of a celebration for the family than for the baby. I love this style of layering paper strips... it reminds me of a kimono obi.
My parents' house is full of accent pillows that my grandmother made. So for her birthday (which is today - oops! better late than never?) I decided to paper-piece a quilt block. I was inspired to give it a go when I read a recent post about patchwork on the Paper Crafts Connection blog. It wasn't difficult at all really - though with a paper cutter with not-quite-square issues and my OCD tendencies (see above!), it didn't come out quite as neatly as I'd hoped. But it's really just another one of those things that bothers me and nobody else even notices! :) I really want to try this same technique - maybe with other quilt patterns too - with some of the new Christmas collections!
And, last but certainly not least! A set of two coordinating mini "jotter" notebooks using Lisa Spangler's binding technique that I shared previously. I love Love LOVE these... I used a high quality text weight paper so that I could include enough pages to actually make a useful notebook. They were both completed in less than one episode of Ghost Whisperer! :)
Hope everyone had a lovely Labor Day Weekend - Everyone in the U.S., that is. If you're not in the U.S., I hope you had a great "normal" weekend! :)
Wednesday, September 1, 2010
a little Papertrey love
Dawn McVey recently featured a card she made using Falling Leaves from the latest Papertrey Ink release. I was so inspired I literally immediately bought the set! And just for fun, some red and green buttons and ribbons to get me through the upcoming holidays :)
Here are my Dawn-inspired cards:
This stamp set is A-Maze-Ing!
OK, I know I missed the boat a little with this one, but I got the Everyday Button Bits stamp set a couple months ago, and I just opened it up a few days ago!
Here are my Dawn-inspired cards:
This stamp set is A-Maze-Ing!
OK, I know I missed the boat a little with this one, but I got the Everyday Button Bits stamp set a couple months ago, and I just opened it up a few days ago!
I didn't really think too much about this card before I made it... or really even while I was making it! :) You can kinda tell that it's a little crooked and off-center, but I still like how it turned out.
Thanks for stopping by!
Subscribe to:
Posts (Atom)