Showing posts with label Spellbinders. Show all posts

Sunday, June 23, 2013

Start-to-Finish Sunday #30 - Bridal Shower Tag

Happy Sunday, friends! Yesterday I went to a bridal shower for a friend. I have a signature bridal shower present: I get a custom necklace with the bride and groom's initials. It's so much fun searching etsy, craft fairs, and local jewelers for the perfect style for the bride! (Don't worry though, we get the couple a "real" wedding gift from their registry too!) So I had the necklace all boxed up in a cute little kraft box, and I figured a handmade tag would be the perfect way to decorate it. But, of course, I was working at the last minute, so it had to be simple! :)


I used the new Label Love stamp set, and a fresh, bright color combination of Pool Party, Bermuda Bay, and Crushed Curry. And of course, I had to add some Glimmer Paper - gotta have bling for a party! I love projects like this because you can create endless amazing embellishments just by layering different shaped punches and diecuts together - Easy peasy! :)


You can watch the video below, or over on my YouTube channel. Hope you enjoy!


Have a great week. Happy Stampin'! :)


Bridal Shower Tag Supplies


Sunday, April 17, 2011

Video Tutorial: Mini Easter Basket

Welcome to this week's video tutorial!

Since Easter is only a week away, I decided to share this little Easter "basket" with you. I love this project because you can literally make any size box you want (as long as you've got paper big enough!) with this template. It's so easy! :)

I used images from "For Peep's Sake" - the same stamp set I used in last week's tutorial. This little baby chicken is so cute!

I love adding unexpected details like these custom colored paper flowers on the handles. I made this basket to fit 4 eggs. We share dyed Easter eggs every year with my Grammy, and this year she'll be receiving them in this. Be aware though, if you're going to put anything even slightly heavy in your basket, you may want to hold it from the bottom rather than by the handle. It is only made of cardstock after all!

Watch video below, or watch on YouTube.


All materials from A Muse Studio, and available at my webstore:
- solid cardstock in Lemon Whip and Sugar
- gingham cardstock in Sage
- polka dot cardstock in Sage
- mini brads in Silver
- Tombow Dual Brush Markers in French Roast, Grass, Papaya, and Lemon Whip
- Copic Marker RV14
- paper flowers Meadow Mix
- Memento Tuxedo Black Ink
- Spellbinders Nestabilities in Classic Scalloped Ovals Large and Classic Ovals Large


Friday, October 1, 2010

StampTV Thursday 9/30 Sketch Challenge

Again, out of all the challenges people post and sketch blogs I read, the StampTV Thursday Sketch is the only thing that actually gets me off the couch. :-D

This week we were, again, given a CAS/Beginner sketch and a Layered/Intermediate sketch.


This week, again, my card is somewhere in between. :)


This card has been in the works for a while... I've been wanting to try a ton of the techniques from Jennifer McGuire's Thinking Inking class since I first saw the videos. (P.S. Have you seen this news??) But I just didn't have enough of the appropriate supplies and couldn't justify buying them, not knowing how often I'd end up using them. Well, obviously, as soon as I tried Distress Inks, I knew I'd use them constantly and so my collection has been slowly growing. :) And I recently found a pot of Perfect Pearls for sale individually (didn't want to commit to the set) at my LSS. And then I got this awesome Hero Arts silhouette stamp that I thought would be perfect for mixing Distress Inks on, and voila! This card was born!

BTW: To make the focal image, I inked up my stamp with Distress Ink in Scattered Straw, Spiced Marmalade, and Fired Brick. Then I spritzed the entire stamp with some water mixed with Perfect Pearls and stamped it onto plain cardstock. It took a couple tries to get it right. :) Check out the videos on Perfect Pearls (episodes one, two, and three!) for this technique and a bunch of other cool ideas.

Have a good weekend!

Tuesday, September 21, 2010

squash!

Hey everybody! Just a super quick post today to show you this card I made with my *first ever* purchase from Lawn Fawn! Their latest release was just irresistible! And these stamps are amazing in person.

Supplies: Cardstock - Pure Luxury by Gina K. Designs (white), Stampin' Up (yellow, kraft); Ink - Versamark, Colorbox Chalk in Chestnut Roan; Stamps - Harvest Season by Lawn Fawn; Misc. - Labels 8 dies by Spellbinders, Stampin' Up clear embossing powder, Pure Luxury by Gina K. Designs ribbon, Copic Markers, 3M foam adhesive

I bought two of the three sets from the new release. This card uses Harvest Season, which is so adorable. I LOVE this cornucopia! My one complaint (sorry Kelly Marie!) is that I can't really tell what some of the vegetables are supposed to be, exactly. But I decided they're various types of squashes and colored them accordingly. ;) I love how perfect this set is for coloring, but it's really fun and whimsical, which is awesome because I don't have the skills or marker selection to make things look super realistic!

I haven't busted out the Christmas set yet - but I promise you'll be seeing it here very soon! :)

Hope you had a happy Monday!

ETA: Haha, it's totally Tuesday! I really had no idea! :)


Thursday, September 16, 2010

{}

(I'm sorry, I just can't think of a good title for this post!)

I've got two cards to share today that I made with the new StampTV kit, Autumn Splendor. I'm really loving it ... been sitting in my living room watching TV (I'm obsessed with Ghost Whisperer... just started the *last* season) and working on Copic coloring a bunch of images to have on hand. These cards are roughly based on Laura's Sketch 60 from 2 Sketches 4 You.

(The sentiment says Happy Harvest. It's easier to see in person.)

Tomorrow's Friday! Yay! Have fun! :)


Tuesday, August 31, 2010

safe to say I'm obsessed?

:-D

I am seriously loving Stampendous Christmas stamps! I can't even believe how wonderful these images are!

Supplies: stamp - Stampendous Cling Snuggle Season; patterned paper - Cosmo Cricket Matilda mini-deck; cardstock - Pure Luxury by Gina K. Designs, Neenah ivory, Bazzill white

Close-up :)
(Are you squealing yet?)

Here's a card I made using the Holiday Wishes set... I wasn't sure what to do with it at first, but now I'm thinking the best thing is to use the sentiments as focal images.
Supplies: stamps - Stampendous Christmas Wishes; patterned paper - October Afternoon; cardstock - Pure Luxury by Gina K. Designs, Neenah white
 
I colored the holly with Copics to frame out the card.
If you happen to get this stamp set, I don't really recommend trying to cut out the bits of holly - They're soooo tiny! :)

A Matryoshka nativity! How do they come up with this?!
Supplies: stamps - Stampendous Cling Nested Nativity, Gina K. Designs Blessed is the Season, Glory to God by Stampabilities; cardstock - Pure Luxury by Gina K. Designs (red), Stampin' Up (ivory); embossing powder - Queen's Gold by Ranger

(Sorry about the wonky angle!)
     
For now I just stamped the image and embossed it in gold. Then I masked it and stamped the scripture stamp from Blessed is the Season (Gina K. Designs) in red. But I can't wait to color this stamp!... I think I might need to pick up a couple new Copics though - not sure I want to put Mary in crayon colors! :)

I don't really know what I was thinking making two cards with embossing in this crazy, sticky, humid heat that's suddenly hit us. But I was so inspired by a card that Jennifer McGuire made with some new Hero Arts ornament stamps, and my buddy Cliff the mailman brought me the gorgeous Ornament Greetings set from Stampendous this morning, so... :)

I used some of the vintage sheet music I got from ebay for another project. (I'll share that one soon I hope!) I scrumpled it all up and rubbed on some Old Paper Distress Ink... and I don't really love how it looks. But that's ok. How gorgeous are those stamps??!?! :)

Thanks for stopping by!

Monday, August 23, 2010

tricks and treats!

ETA: It finally stopped raining here, so I was actually able to get some half-way decent photos of these cards. They're still not stellar... Man, I need a new camera! :)

I'm pretty sure Stampendous's Costume Kids stamp set is THE cutest thing I've ever seen! And I just happened to get Cosmo Cricket's Matilda mini-deck in the same envelope as the stamps! :) They're both cute and kid-like and whimsical so they go perfectly together.

This little vampire was just begging me to paper piece his cape :)
And how adorable is this paper?
Here's the whole card...

The set also includes precious little girl in her kitty costume. I wanted to color her orange, but I only have a small selection of oranges and yellows and I knew I'd have to use them on her pumpkin pail. So I chose to use two Warm Grey markers and smudge them around with my blender pen. And, I'm so psyched I *finally* got Spellbinders large and small classic oval Nestabilities! Have to say, actually, I'm a little disappointed that they don't go a little larger... I've already run into two Christmas stamps I was planning to use with them that don't fit :( But I'm still pretty darn psyched to have them!
 
Oh, and check out those cute little mice in the background paper! :)

The mini-deck includes a really fun paper with black and charcoal clouds with a little moon in the corner. I stink at "scene" cards, but I couldn't resist trying to combine that paper with the vampire. I definitely feel like this card is missing something, but I don't hate it.


I stopped in at the store where I'm selling my cards a couple days ago. It looks like I sold 9 cards in 9 days! So I have to try really hard to set aside Halloween and Christmas for a little while and get some fall-ish-looking "everyday" cards made to get me through September. My goal is to get 20-25 Halloween cards out on October 1st, 20-25 Thanksgiving cards out November 1st, and 20-25 Christmas/Hanukkah/Solstice cards out December 1st and have that be it for the store. Add to that another 20+ Christmas cards as well as all my other paper and fabric items for the craft fair I'm doing on November 20 ... which is now officially less than 3 months away!! ... Needless to say, it's a little daunting. I think I need to figure out a way to get myself a little better organized and set some more specific goals!

So, I hope you're having a great weekend! Thanks for stopping by!


Thursday, July 22, 2010

it makes me want to wag my tail

MAIL! :)

Yesterday was a good day - well, in the mail arena at least. I ordered my first stamp set from Gina K. Designs. I recently discovered her store and her StampTV site - probably through a youtube video or something. Her style is clean and graphic like mine, but her cards are all kind of the same... the best word I can think of is uninspired... They're lovely and well made but all just layered solid-colored cardstock and stamps. I like more patterned paper and embellishments and stuff. But her videos are great - There's just something about her over-the-top bubbly charm that I'm loving! So I followed their July release and fell in love with the Christmas in July stamp set.
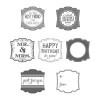
It's called Blessed is the Season... I'm not at all religious, so I don't usually go for stamp sets with scripture and sentiments that mention God. But, on the one hand, if I'm trying to promote my etsy store better, there's a huge market for religious cards. On the other hand, the less shrewd hand, I love this stamp set! The images are lovely and simple and I adore the mix of fonts.

Now, I don't really do enough stamping to be able to give a fair review of how these stamps compare to others. I've only used a couple so far. I had a little trouble with the block of text inking up properly, but when I switched to a different ink pad it worked just fine.

I also bought a holiday themed cardstock assortment to try out Gina K.'s Pure Luxury cardstock.
Here's my biggest complaint with it: The description is "Contains 5 sheets of 5 Pure Luxury card stock colors in assorted weights and textures." OK. Isn't the idea of a cardstock assortment to get you to buy more in the future? What if I love what I get? I won't know what to reorder if they don't tell me what I'm using! And how do I know which of these cardstocks are appropriate for various projects? Pure Luxury has a base weight and a layering weight and they're not necessarily interchangeable. So far I've only used the white, which I'm pretty sure is the base weight. I really do like the weight of it, but it's so smooth that it's almost glossy, which I don't love. It seems to stamp nicely, but I had some trouble getting my favorite Colorbox chalk ink to dry, which led to smudging and having to re-stamp over and over. (Now I understand why Gina K. uses dye ink in her videos!) I'll let you know how the other cardstocks work out, and if I figure out which one's which!

In the meantime, here are my first two projects with Gina K. Designs products. I used emboss resist on both, with Tim Holtz Distress Ink in Broken China. (If you're not familiar with this technique, you must check out Jennifer McGuire's Thinking Inking class for 2 Peas!)

This is my favorite stamp in the set - which is a little weird considering I don't usually go for the religious sentiments. For some reason I just love the concept of a "conspiracy of love"... I don't know if it's from somewhere in particular but I love it. Rather than using one focal image, I wanted to make a super simple card with the sentiment as the focus. (The navy cardstock is from Paper Source; I used Gina K. Designs and Bazzill white cardstock.)

On this card I did emboss resist on the dove after stamping the text block stamp in gray. This was where I had trouble with the text stamp, but I think it was really the gray ink. This is more in keeping with Gina K.'s style of cardmaking. It makes me wish I had more Nestabilities so that I could create thinner borders, but I kept the 1/4" border fairly consistent so I don't hate it. But I'd rather have a 1/8" border! The white background is embossed with the paisley Impressabilities.

More to come soon from this stamp set! I'll let you know how I like it as I continue to use it!

Thanks for stopping by!