Showing posts with label thank you. Show all posts

Friday, August 14, 2015

Video Tutorial: Multi-Color Stamping with Sponge Daubers

Hey there! A while back, I posted a video on YouTube and I never got around to sharing it here. It's a tutorial on one of my favorite techniques - inking up a stamp with sponge daubers to get a multi-color image. This technique also gives you a great blended look. It works best on solid stamps with a lot of area, not line-art images. I used one of the new Hostess stamp sets called Silhouettes & Script. If you place a Stampin' Up! order of at least $150, this is one of the exclusive items you can choose as a Stampin' Rewards benefit.

Here's the card I share in the video...


And here's the technique!


There are a few other cards that I show in the video that I made using the same technique and stamp set. Here they are...


Hope you enjoy the video and that you give this technique a try! As always, holler if you have any questions.

Happy Stampin'! :)

Monday, March 30, 2015

Baby Thank You Cards

Hey all! Long time no see, huh? :) Sorry I've been MIA, and in fact it's been so long since I updated the old blog-o that I haven't shared some very big news with you all... I'm having a baby!! :-D It's a girl, and she'll be here around the end of May - 2 months to go! Hubby and I are very excited, and starting to get real preparations underway. My work colleagues have already thrown me a small but extremely thoughtful shower, and my "regular" shower is in a couple weeks, so I'm starting to think about designing thank you notes. Want to see what I've got so far?


This is the first one I made, and I was kind of playing around for a sketch challenge at the time. I will definitely not be making 30+ of this card! :-P We don't have a dedicated nursery space in our house, but for cohesion we're going for a yellow and gray color scheme with as many baby things as possible. And we've chosen elephant as Baby's signature animal. (Hope she likes them!) So for my cards I'm using Smoky Slate, So Saffron, and pops of Crisp Cantaloupe, seen here in the Sweet Dreams DSP and In Color Sequin. The adorable elephant stamp is from the Zoo Babies stamp set, and the sentiment is from Something to Say.


This card is way more mass-produce-able! :) So I think this is the idea I'll end up going with, but I want to rotate it to a horizontal card rather than vertical. Unfortunately, the Happy Heart embossing folder - which I adore - is vertical, so I'll have to choose a different embossing folder to add texture. Otherwise, the elements are really similar to the first card, but simplified. The elephant is matted onto some Dazzling Diamonds glimmer paper (love the redesign they did on the color of this stuff!) which is hard to see in the photo, but really pretty in real life. It adds some interest to what would otherwise be a lot of white space.

OK, well, that's it for me for today. Two cards, and some big news! :) I'll try to get some more posts up in the near future.

Happy Stampin'! :)

Friday, September 19, 2014

Fall Wreath Card

Just a sweet, simple card to share with you today. :) I've shared a couple cards made with the new Fall Fest stamp set - I guess I like this set!


I'm particularly in love with the cute little leaves that are in this set. For this card, I decided to create a wreath with them. I just traced one of the Circle Framelits lightly onto my Naturals White cardstock panel. Then I just stamped the leaves around the circle. Easy! And it works great because these particular leaf images all have a slight curve to them, so they form the wreath shape beautifully. The sentiment is from Four You - I love this font!


I created a little embellishment for the wreath by layering a button (it's from a retired button collection), some linen thread, a sequin (from the Gold Sequin Trim) and a pearl. Cute!

Happy Stampin'! :)

Tuesday, September 16, 2014

Partial Diecut Pumpkins

Hands down, die cutting is one of the coolest and most convenient things in a crafter's arsenal, don't you think? And you can get such amazing effects with all sorts of different die cutting techniques! I've shared cards in the past using partial die cutting techniques, where the die cut image sort of hangs off the fold of the card. I used a similar technique on today's card, but smack dab in the center of the front panel!


You could absolutely get this effect by cutting out the window and adhering the pumpkins over the bottom of it. But by using partial die cutting, the whole thing is seamless and it's such a cool effect. Here, I can prove it...


Look where the circle meets the pumpkin on the left. It's all one piece! Love this! If you want to see how to achieve partial die cutting on your projects (it's not hard, I promise!), I would recommend Jennifer McGuire's video. It spells out the technique really well.


I used two stamp sets on this card. The pumpkins are from Fall Fest, which is a great photopolymer set in the Holiday Catalog. It's kind of a cutesy, Halloween-y set, but I chose to grow it up a little more on this sophisticated card. I used Pumpkin Pie, Tangelo Twist, and Tangerine Tango inks, and the stems were stamped in Old Olive. The sentiment is from Kinda Eclectic. I love this sentiment because it goes with the fall/gratitude theme, without being a generic "thank you." The green background from the Color Me Autumn DSP collection.

Thanks for stopping by today. Happy Stampin'! :)

Sunday, September 14, 2014

Start-to-Finish #41 - Masked Leaves Card

Remember my recent post for the September Cards Challenge from Catherine and Cathy Create? The challenge this month was masking. The card I'm sharing with you today was the first card I made for that challenge. In the end, I decided it was just a little too clean and simple, and I wanted to step it up a little bit. But I still think it's a pretty card.


I used one stamp set for this card, from the new Holiday Catalog. It's called For All Things, and it's got some great watercolor-look images and some really awesome sentiments. I also used the Color Me Autumn DSP and coordinating washi tape.


You can watch the video below, or over on my YouTube channel. Enjoy!


Happy Stampin! :)

Sunday, September 7, 2014

CCC#044: September Cards Challenge - Fun with Masks


It's time for another Cards Challenge from Catherine and Cathy Create! This month, it's all about masking. Stampin' Up! has recently released some awesome stencil-style masks that I'm totally in love with. (One set is Dots and Stripes, the other is Hearts and Stars - they're so cute!) But I decided to do some CAS masking for my card this month, using some of the new fall stamps from the Holiday Catalog.


I used Post-Its to mask off a frame around the edge of a piece of Naturals White cardstock. Then I stamped the cute little leaves from the Fall Fest stamp set. (It has matching Framelits too - and comes in a bundle at 15% off!) I used Crushed Curry, Tangelo Twist, Cherry Cobbler, and Crumb Cake inks.


I embossed a sentiment from another new set called For All Things in gold on Early Espresso cardstock. I created the little embellishment using the Fun Fall Framelits (that match the Fall Fest stamp set), one of the Autumn Wooden Embellishments, and linen thread. Hey - Did you know you can make your own metallic cardstock? All I did to make that cute little leaf gold was press my Versamark ink pad on some scrap cardstock, shake on some gold embossing powder, and heat set it. Then I just die cut the leaf out of that! Easy and adorable!

So now it's your turn! Check out Catherine and Cathy Create to see what the other DT members made. Then link up your project using masks, and you might win goodies from Stampin' Up!

Happy Stampin'! :)

Monday, September 1, 2014

CCC#043: September Monthly Challenge - Primary Colors


CCC#043: September Monthly Challenge
Primary Colors

It's September, and we all know what that means... Back to School! So this month's challenge is inspired by Primary Colors. Think crayons, construction paper, lunch boxes, playground equipment, new sneakers... And make a project inspired by that! And here's a little inspiration photo to get your creative juices flowing even more.


I decided to make a card for this challenge. I will admit, I was more inspired by the back to school theme, and the inspiration photo above. So let me just say that, while I know that primary colors are only blue, red, and yellow, I chose to go with more of a rainbow look, like in the photo.


I was inspired by a card in the recent issue of our demonstrator magazine where they trimmed down one of the dies from the Homemade Holiday Framelits to make arrows. I decided to trim the die cut a little bit further, and make pencils!


I colored the "wood" part of the pencil with one of the Skin Color Blendabilities markers, and drew on the "lead" with a black marker. The colored part is cut with the same die, and then I used the smallest of the Starburst Framelits dies to cut the little zig zag parts at the top. The lines are stamped with one of the stamps from a great new border set called Draw the Line. The stars are punched from the Confetti Star Punch - one of my faves from the Holiday Catalog.

I was thinking this card would be cute to give to a teacher, so I chose the sentiment from one of the new hostess stamp sets. It would maybe be a little more relevant for the end of the school year, but I still thought it was fitting.

Now, make sure you head over to Catherine and Cathy Create to check out the other challenge projects. If you want to play along, make sure you link up your project, because you could win Stampin' Up! goodies! :)

Happy Stampin'! :)

Sunday, May 11, 2014

Don't be so negative!


One of the easiest ways to change up how you use your Framelits and other dies is to use the negative of the die, rather than the little piece that's cut out (the piece you're "supposed" to use). That was what I wanted to do with this card, and I wanted to keep it nice and simple to really show off the technique.

I used the Word Bubbles Framelits to cut the tall and skinny bubble out of my square Coastal Cabana cardstock panel. Then I embossed the panel with the Honeycomb embossing folder. So then I basically had an embossed square piece of cardstock with a hole in it :) I put snail adhesive all around the edges of the opening on the back of the panel, and adhered a piece of the Kaleidoscope DSP behind the opening. It's simple and very striking. 


The sentiment is from the stamp set that coordinates with the Word Bubbles Framelits. It's called Just Sayin'. FYI both of these items will be carried over from the Occasions Catalog into the new Annual Catalog coming out in June! :) I stamped the tiny heart from the set randomly across the background, to soften the card a little, and punched out a heart from Crushed Curry cardstock to add to the sentiment. Easy as pie!

Happy Stampin'! :)

Saturday, April 26, 2014

Technique Video: Using the Hexagon Hive Thinlit Die as a Stencil

Hey there! Today I have another quick video tutorial to share with you. I made a card for a recent class where I used the Hexagon Hive Thinlit die to create a stencil. I used sponging to get a really fun and totally on-trend ombre effect. Check it out!


Pretty simple card, but what a great look! I also used Gorgeous Grunge to add even more texture to my card front. The sentiment and the label I stamped it on are from the Chalk Talk stamp set and dies. (Get them as a bundle to save 15%!) Easy-peasy! :)

Check out the video below, or over on my YouTube channel. Have fun with this technique! What other dies can you use as a stencil?


Happy Stampin'! :)

Friday, April 25, 2014

Retirement Party: Lacy and Lovely


Let's take a minute to celebrate Lacy and Lovely! 


This set is so pretty! I love it for super quick CAS cards, or for beginning stampers. Or step it up and try it out with a cool technique like emboss resist! :) I went the quick-and-easy route on the card I'm sharing with you today. The images in this set make awesome stamped backgrounds! I used Rich Razzleberry, Old Olive, and Summer Starfruit on this card. (NOTE: Summer Starfruit is a retiring color, but as of the writing of this post, Summer Starfruit ink, as well as the Modern Medley DSP I used on this card, which is also retiring, are still available! Sadly, the Old Olive ribbon is sold out.)

Want to know my favorite thing about this set, though? The greetings! :) You know how i love mixed fonts! LOL. But seriously. These sentiments really have the perfect balance of every element... Not too feminine or masculine... They're not really large or long so they fit almost everywhere, whether you need a horizontal or a vertical sentiment... I definitely have reached for these greetings a lot! (In case you're wondering about the sentiment I used on this card, though, it's from A Dozen Thoughts, which is not retiring. I love it because it's got great general sentiments that are just a little bit more unique than the standards without being so quirky you never know when to use them!)

Remember: TODAY (Friday, April 25th) is the LAST DAY to get FREE (standard) SHIPPING ON ALL ORDERS! Go to my website or email me ASAP to place your order!

Happy Stampin'! :)

Sunday, March 16, 2014

Start-to-Finish Sunday #36 - Starburst Sayings Thank You Card

I'm back with a video! Can you believe it?! :) A day on the sofa with a stuffy nose gave me the perfect opportunity to learn the newest version of iMovie and get this video edited. Believe me, I wish I could breathe, but I'm glad I'm finally getting a video posted!


This is a card I made for a recent class. Pretty simple, using just one stamp set and a background stamp. The color palette was directly inspired by the I Am Me DSP that I used.


I also took advantage of some of the awesome embellishments in the Occasions Catalog. Let me tell you... Stampin' Up! has really stepped up their embellishments! They are so cute and perfectly on-trend. I used the gold sequins, gold baker's twine, and a super cute wood veneer heart. LOVE! :)

Check out the video below, or over on my YouTube channel. Enjoy!


Thanks for stopping by. Have a good week!

Happy Stampin'! :)


Starburst Sayings Thank You Card Supplies


Monday, October 7, 2013

CCC#011: Cards Challenge - In Threes


It's the 7th of the month - You know what that means! Another Cards Challenge over at Catherine and Cathy Create! :)

I have to be honest here and tell you that this month's challenge completely slipped my mind! I had it on my calendar, my weekend to-do list... I even had my card all designed out in my head! And I didn't remember any of it until I was in the shower today at 7am! :(

Anyway... This month the cards challenge is "
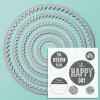
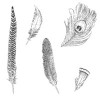
In Threes." That is to say that any element on the card repeats three times. This was a real challenge for me! I decided to use the awesome new Envelope Punch Board to make a gift card size card and envelope set. And to add a little pizzazz I decided to make the envelope with vellum. Check it out... :)


OK, OK, so I bet some of you have already caught me... I used the feather stamp *four* times. So sue me :-P I only used it three times on the card. The envelope just needed another repetition of the feather! LOL.


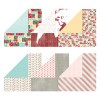
So here's the card alone. Seriously, I cannot stop using the Sweater Weather DSP! It was totally the inspiration for the color palette I used on this project. I LOVE these colors, and I love that they don't have to be just for fall-themed cards.


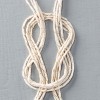
Here's a better look at the envelope, and you can really see the vellum in action. I used Tombow Mono Multi Glue to secure the envelope together. I didn't love how the bottom flap looked, so I used the strips of DSP and cardstock to hide it. Vellum envelopes are just so classy, don't you think? :)

So now, even though I'm a little late in posting this, make sure you head over to Catherine and Cathy Create to see what the other DT members made. And if you play along too, you might win some Stampin' Up! goodies! So get on over there, get inspired, and link up your project!

Until next time... Happy Stampin'! :)


Three Feathers Card and Envelope Supplies