a little blog about fabric, paper, food, and family.
set in the charming Cape Cod town of Brewster.
perpetually covered in cat fur.
Monday, August 19, 2013
Confetti Birthday Tag
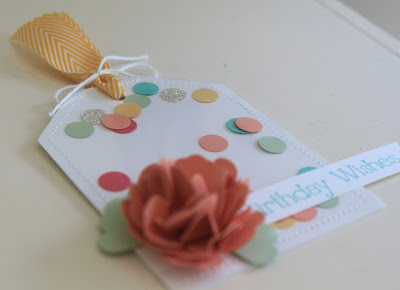
Yeah, yeah, another tag. Are you sick of them yet? :) This is one I made for a co-workers 60th birthday surprise party. Confetti is another really big trend these days - and it seems to just be getting bigger! I tried playing with the confetti look for one of my Convention swap cards, but I love the idea of working actually 3D confetti into my projects.
This tag came together way easier than I thought it would. I just cut the same tag shape out of Whisper White cardstock and Window Sheet. I sandwiched a handful of little punched circles in between them, and sewed around the edge.
The flower embellishment is made with a bunch of pieces punched with the Pansy Punch layered together, secured with a brad in the center, and scrunched up. Check out the great dimension - I love it!
The sentiment is from the set Four You - it's pretty much my favorite greeting set right now! And just look at how cute the tag looks on just a simple brown paper lunch sack! Easy peasy! :)
Happy Stampin'! :)
Saturday, August 17, 2013
Beach Babe Birthday Tag
My sister-in-law's birthday was back in July, but I just haven't gotten around to sharing the tag I made for her present with you yet! Jill lives at the beach in the summertime. (I'm jealous. I wish I had the time to go to the beach!) So I picked out some amazing all-natural sunscreen, yummy-smelling bathing suit wash, and a cute tank from an awesome local screenprinting business. And, of course, I had to make the wrapping match the theme of the present! :)
Cute, huh?! I used Canvas Creations from Stampin' Up! - it's this amazing 12x12 canvas that's perfect for stamping and all sorts of other techniques. For this tag, I used Pool Party reinker to dip dye a tag shape cut from the canvas. (Dip dye and ombre looks are super trendy right now!)
Then I stamped a few of the shells from By the Seashore in Pacific Point, Pool Party, and Crumb Cake, cut them out, and adhered a linen thread bow behind them. The birthday sentiment is from a new stamp set called Four You.
OK, I'll admit, this tag was a little time consuming, but all of the techniques I used were super easy. And I love how it turned out! And once the tag was made, the rest of the packaging couldn't have been simpler. Just a solid colored bag from Hallmark, and some white tissue! That's what I love about a homemade tag!
Thanks for stopping by today.
Happy Stampin'! :)
Thursday, August 15, 2013
Convention 2013: Roommate Gift
OK, so Convention was almost a month ago, and I've only shared one of the posts that I intended to write about the weekend. I can't even believe how quickly this summer has gone by!
Today I want to share a fun project with you. It seems to be a Convention tradition to give a little handmade treat to your hotel room roomie. I was rooming with my upline Jen, but since we were traveling together too, I actually gave it to her before we left, rather than schlepping it all the way there.
Jen's style is way different from mine. She's more into the vintage, shabby look. So I tried my hand at that style for this project. The tag is from the Chalk Talk Framelits, and I used Crisp Cantaloupe ink and a brayer to color some Creped Filter Paper to make the ruffles at the bottom. The sentiment is from the Chalk Talk stamp set.
The topper on the jar is also the Creped Filter Paper, colored with Baked Brown Sugar ink. Love this stuff!
Happy Stampin'! :)
Thursday, August 8, 2013
CCC Blog Hop: Back to School
Hey there! Welcome to the first Blog Hop with the Catherine and Cathy Create Design Team. If you've come from Christine Wells's blog, you're on the right track. If not head back to the beginning of the hop to make sure you don't miss any of the awesome projects!
I was really lucky growing up in that my mom only worked part-time outside the house during my childhood. She drove me to school and packed my lunch pretty much every day all the way from elementary school through high school. (And yes, you understood that right, I did not have a car in high school. lol.) And even though high school, it wasn't rare for me to find stickers on my sandwich baggie. Since I've been really into tags and 3x3 cards lately, I thought it would be fun to make a little set of lunchbox notes. It took me no time at all to make these three and it would only take minutes more to make a whole slew of them. I love the idea of sending a cute little handmade note of love and encouragement in your child's lunchbox!
I've put a complete supply list for these little cards at the very bottom of this post, so make sure you scroll all the way down. But first, the business of the Blog Hop! How does some Blog Candy sound? The prize is the Label Love stamp set from the new Stampin' Up! catalog. :)
Here's how to enter:
1. You must be a follower of Catherine and Cathy Create. Please follow us via email, Google or Bloglovin'.
2. Leave a comment on each of the DT members' pages by August 11th at 11:50 EST. Each comment counts as one entry.
The winner will be announced on August 14th in the new Tag Challenge post.
Up next on the Blog Hop is Megin Gallagher. You can use the buttons at the bottom of each of our posts to navigate, but in case you get lost, here's the whole list:
Now hop on and have fun!
Happy Stampin'! :)
Lunchbox Notes Supplies
Wednesday, August 7, 2013
CCC #005: In the Garden
It's time for another Catherine and Cathy Create Card Challenge. This month the theme is "In the Garden." Sounds easy, right? Probably like 50% of Stampin' Up's stamps are flowers. But I have to admit I really struggled with this one! I really don't do flowers a lot. And I only have three flower sets. I borrowed the Flower Shop set and the matching Pansy Punch from my upline, but at the time I was planning on trying a pretty unique color challenge from another blog, so I punched all the flowers in those colors, then gave everything back. Then it turned out I just couldn't make those colors work! So I decided to go in a different direction entirely. I mean, there are other things in the garden besides flowers, right? Wanna see what I came up with? :)
Butterflies are in the garden too, right? And my washyard is right next to my garden, so the clothespins seemed fitting when I was trying to figure out how to add a little dimension and interest to the butterfly punches. :)
Super-duper simple card, but a lot of dimension and texture added with the ruffled ribbon, doily, and clothespins. Oh, the mini clothespins are from the Tag a Bag Accessories kit.
So, if you haven't been over to Cathy and Catherine Create yet today, make sure you head over there now! Go check out what the other DT members have created!
Happy Stampin'! :)
In The Garden Card Supplies
Sunday, August 4, 2013
Christmas in July Week - Day Seven: Poinsettia Polaroid Card
Sadly I don't have a Start-to-Finish Sunday video for you again this week. :( Sorry! I knew I wanted to make this card, and I did film it, but once I started editing the video I realized that this was not a great card to share start-to-finish! It would have been SO long! I got bored just editing the video, so I knew you all wouldn't like it. But don't worry, I did make you a shorter video about this card: A tutorial on how to make the Polaroid-style frame using the Square Collection Framelits. :)
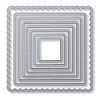
These frames that look like Polaroids or like vintage slides (Like for a slide projector. Anybody remember those? lol.) are so trendy right now! They're great for scrapbooking or for photo cards like family Christmas cards, or birth or engagement announcements. But I love the idea of using them in an out-of-the-box way, like I did on this card to frame and give dimension to the focal image! Anyway, you can check out the video below, or over on my YouTube channel.
I used the Joyful Christmas (#131802 wood/#131805 clear) stamp set again for this card - I love that poinsettia image! - and another new set from the Annual Catalog, the Dictionary (#130348 wood/#130351 clear) background stamp. I'm so excited Stampin' Up! gave us this stamp since they retired the First Edition DSP that I was so obsessed with. I sure do love a good text print! :-D The colors are Smoky Slate, Pool Party, Strawberry Slush, and Wild Wasabi. Not traditional Christmas colors, but they're bright and fresh.
So, thanks for stopping by today. I hope you had a great weekend!
Happy Stampin'! :)
Saturday, August 3, 2013
Christmas in July Week - Day Six: Snowflake Envelope Gift Bag
Day Six? Huh? Yup, you read that right! :) Originally I had planned for Christmas in July Week to go Monday through Friday, with 5 projects in total. But then I decided to kick start things early last Sunday. And I was already planning on a bonus project for this week's Start-to-Finish Sunday video, so then I figured I might as well fill in the empty day with another project! So instead of 5, you get 8 Christmas projects in total. :)
Since I've mostly done cards so far, I wanted to share another gift wrap idea. There were a lot of things I wanted to combine into this project. The final project, I think, might be a little over-the-top, but I still like it.
This is one of my favorite DIY packaging techniques - making a gift bag out of an envelope. Yes! It's so easy and comes out so cute every time! (See my video tutorial on YouTube for instructions.) I used two of my current favorite colors, Pistachio Pudding and Pool Party. Such a pretty combo that can go from summer right to winter! I also added pops of silver with the new Silver Metallic Encore Ink (#132142) from the Holiday Catalog. (It's also available in Gold, #132141.)
I made the tag with the Festive Flurry stamp set (#131778 wood/#131781 clear) and matching Framelits (#132193). Head's up - Savings Alert! These stamps and Framelits also come together in a bundle at a 15% savings! (#133284 wood/#133285 clear) To see how I made the dimensional layered tag check out this video from Stampin' Up!
I also used a new die from the Holiday Catalog - this is definitely in my Top 3 Faves in the whole catalog! It's the Gift Bow Bigz Die (#129977) and it makes two sizes of these amazing paper bows. This is the smaller one. I'll do a video soon showing how to put them together, but it's really quite easy. This style of bow has been everywhere lately, and this die makes it so easy to create the perfect one. Just check out the dimension on this beauty!
WOW! I'm pretty sure one of these is going to be on everything I give this Christmas. :) Love, LOVE this die!
So, stop on back tomorrow for my Christmas in July (...ehrm, August. Yeah, whatever - LOL!) edition of Start-to-Finish Sunday. I'm planning to demonstrate another fun die cutting technique. Until then...
Happy Stampin'! :)
Subscribe to:
Comments (Atom)

