Showing posts with label Christmas. Show all posts

Sunday, June 14, 2020

Charm Square Tree Skirt


Pattern: Charm Pack Christmas Tree Skirt by Fat Quarter Shop

Top Fabrics: Little Tree by Lella Boutique charm pack, Little Tree "Tin Snow"

Backing Fabric: Little Tree "Poem Frost"

Binding Fabric: Little Tree "Farmhouse Stripe Snow Cranberry"

Started: unknown, but I finished piecing the top in early September 2019

Completed: April 28, 2020

Made for: our family

Notes: I was determined to finish this in time to use for Christmas 2019, so I purchased a label dated 2019. But the first Christmas it will actually be used will be Christmas 2020. I also attached 2 of the blocks backwards, so not all of the scallops point outwards like they're supposed to.


Christmas "Crazy Quilt"


Pattern: my own, using Lori Holt's Crazy Quilt Papers

Top Fabrics: Merriment by Gingiber layer cake, Moda Bella Solids Snow jelly roll 

Backing Fabric: Merriment by Gingiber "Holly Snowflakes"

Binding Fabric: Merriment by Gingiber "Cocoa Fur"

Batting: 80/20 Silky Blend Happy Cloud Quilt Batting by FQS 

Started: October 2019 

Completed: December 22, 2019 

Made for: Nate 

Notes: First quilt I basted using the "pool noodle" technique.


Sunday, December 14, 2014

An Easy and Adaptable Christmas Card

Funny story: I recently hosted my annual "Cocktails and Christmas Cards" workshop, and in trying to design 4 different cards that were appropriate for beginning stampers, I just could not for the life of me make anything in traditional red and green! Not that there's anything wrong with that... I love non-traditional colors for Christmas! :) But this card that I want to share with you is a variation on one of those workshop cards. It was also inspired by about 3 or 4 cards that I found on Pinterest, so I can't take all the credit. :)


This card comes together so easily and it's perfect for assembly-line style mass-producing. It's a great sort of rustic color combination thanks to the amazing new Kraft cardstock, plus Garden Green and Cherry Cobbler. I sponged the background with one of the stencils from the Hearts and Stars Decorative Masks and Whisper White craft ink. (Do your sponging on all your Kraft panels, then work on your embellishments while all the stars are drying.) The tree is from one of my favorite sets from the Holiday Catalog: Festival of Trees (it also comes in a bundle with the matching punch). A punched glimmer paper circle, a little Cherry Cobbler banner, a linen thread bow, and... done! The sentiment is from Ornamental Pine, and it's stamped in Chocolate Chip ink.


Now, let's say you're really in a hurry. Or maybe you want to keep your supply cost as low as possible. Check out this cute and extra super simple version of the same card.


This one saves a bunch of time by leaving off the glimmer paper circle - you can save time not having to punch or die cut all those circles. Now, I did want a little sparkle on this CAS version so I punched the star from the glimmer paper, but if you don't have it or don't want to buy it, the stamped star would look just as wonderful!


Happy Stampin'! :)

Monday, December 8, 2014

CCC#053: December Cards Challenge - Walking in a Winter Wonderland

CCC#053
December 2014 Cards Challenge
Walking in a Winter Wonderland

This month's card challenge marks my last challenge with Catherine and Cathy Create. We've had a great time bringing you fun projects and challenges to spark your creativity, but unfortunately, Catherine and Cathy - and all of us Design Team members, to be honest - have just gotten too busy with life to keep up! So sadly, the challenges will end with next week's December tags challenge. But we hope you'll continue to follow our individual blogs, as we'll all still be creating and sharing!

So this month's card challenge is all about winter... Snowflakes, snowmen, sledding - whatever makes you think of winter. So check out my fun and frosty (and super easy to duplicate!) card.


Red and aqua is one of my favorite color combinations of all time - especially for Christmas cards. And how fun do they look on this adorable snowflake stamp from the Seasonally Scattered stamp set?! I used a super fun and very easy technique called thumping to get the 2-color stamped image, and if you scroll all the way to the bottom of this post, you'll find a video tutorial on this technique.


Then I just finished off the card with some simple layering, some twine and an adorable metal snowflake embellishment, and of course, some sparkle with glimmer paper. :) Easy and totally do-able if you want to make a whole bunch!


So I hope you'll take the time to stop by Catherine and Cathy Create and check out the other winter-themed cards. Thanks for stopping by today! Oh, and if you're interested in learning about the thumping technique for inking stamps, make sure you watch my quick video below.


Happy Stampin'! :)

Monday, December 1, 2014

CCC#052: December Monthly Challenge - Home for Christmas


CCC#052: December 2014 Monthly Challenge
Home for Christmas

December already! Does anyone know where 2014 has gone?? I'm having a hard time even entertaining the idea of Christmas, let alone actually preparing for it! :) But working on handmade Christmas projects sure does help get me in the holiday spirit!

The group challenge for December is to make a Christmas home decor item. I don't typically do a lot of non-card projects, and this one was a little open-ended for me. I have to admit, pretty much all of the credit for this idea goes to my dad. :) We were sitting around talking on Thanksgiving, and I mentioned I had to do this challenge project. So he started looking around the house and making suggestions. He makes these hand-carved wooden hearts that hang on the wall that we put lavender in, and suggested I make something similar out of paper. So that's what I did! 


This project was a little time-consuming, but very easy. I cut two of the largest die from the Hearts Framelits out of the brand new, totally awesome, heavier weight, kraft based Under the Tree DSP. I wanted to sew the two hearts together to make the pocket, but I don't currently have a functioning sewing machine, so I decided to do it by hand. That was the time-consuming part, but I just put on some of my favorite Christmas tunes and enjoyed the process. :) Plus, I think it really adds to the rustic look of the project.


To decorate the heart, I used a few of the elements from the Many Merry Stars kit. There are so many pieces in the kit that I'm not even going to notice a few of them missing when I go to put the stars together!


The sentiment is from the Many Merry Stars photopolymer stamp set. I stamped it in Real Red ink to match the Real Red satin woven ribbon. I also added a punched Real Red cardstock star and a little baker's twine bow (those didn't come from the kit).


I hung it from one of the knobs on my kitchen cabinets, and I think it looks adorable as-is or with a few sprigs of holly tucked inside. It would also be great to give to someone with a small gift (cash or jewelry would fit great - wink wink!) tucked inside.

I hope you enjoyed this project, and I encourage you to hop on over to Catherine and Cathy Create check out all the great inspiration for decorating your home this holiday season. If you're inspired to make a project of your own, make sure you link it up to the group post, because you could win a prize!

Happy Stampin'! :)

Saturday, November 29, 2014

Watercolor White Christmas

White Christmas is, hands down, my favorite stamp set in the Holiday Catalog. You know how much I love any stamp set that is perfect for watercoloring! And this one really fits the bill. :) I've made a few cards with it, but today I wanted to share my favorite with you.


I had so much fun making this card! So much watercoloring! :) And I love making cards with tags on them. Sometimes it's just so much less pressure designing a tag, and then it can be really fun designing a simple card base to showcase your cute tag.


It's a little hard to see in the photos, but I also used an amazing new punch from the Holiday Catalog called Confetti Stars. It's a border punch that cuts out a ton of tiny stars - and bonus, you can use the stars as confetti, shaker card material, or accents on other projects! I punched it from a border of Dazzling Diamonds glimmer paper.


And here's a closer look at the watercoloring. Done simply, as always. But I really love how it looks.

So anyway, yeah. I don't really have too much to say about this card, I guess. LOL. Just wanted to share!

Happy Stampin'! :)

Friday, September 12, 2014

First Christmas Card

It's actually been a few weeks since I made this card, but here it is... My first Christmas card of 2014!


This was such a fun card to make! It took maybe a little more time than some cards, but I think the results are well worth it. :) I used the brand new and totally amazing Tree Punch to create both the Pistachio Pudding trees and the 3-dimensional trees. For the Pistachio Pudding trees, I punched the tree out of some scrap paper (just printer paper, nothing fancy), and used it as a stencil to sponge on the ink. I also stamped the Dictionary background stamp in Pistachio Pudding before lifting the "stencil" and moving on to the next tree.


These cool 3-dimensional trees were created by punching a mess of trees from a piece of Typeset DSP - I think each tree has 6 punches. (I don't quite remember, sorry.) Then I just folded them all in half, covered one half generously in snail adhesive, and glued them together back-to-back. A little time consuming, but ultimately pretty easy.


I also used a new stamp set from the Holiday Catalog that I totally love. It coordinates with the Tree Punch - it's called Festival of Trees. I stamped the cute little baubles on the trees, and embossed them with silver embossing powder. The sentiment is also from the same stamp set, and I embossed that in silver too.

So there you have it! My first Christmas card of the year! Hope you liked it. Have you started on your Christmas cards yet?

Happy Stampin'! :)

Monday, December 23, 2013

Two Last-Minute Christmas Cards

Who's ready for Christmas?? :-D I'm *thisclose* to having everything ready… but I'm hosting this year so I still have a lot of cooking to do. But in the midst of all the hustle and bustle, I wanted to pop in and share two last-minute card ideas.


This one's super simple and you can pretty much make it with any supplies you have. Living on Cape Cod, I make a lot of beach themed things. But you can, of course, use any stamps you like in any color scheme you like. But the idea is super simple - stamp a repetitive pattern on a cardstock panel, add a little ribbon and a little DSP and you're good! I chose to tear the bottom of the DSP just to add a little interest. Also, in subsequent versions of this card, I used the 2-Way Glue Pen to add a little Dazzling Diamonds glitter to the centers of the sand dollars. Easy peasy! :)


This one shows a sneak peek at one of my favorite new Framelits collections from the upcoming Occasions Catalog. See that Polaroid-style frame? A while back, I showed you how to make something similar with the Squares Framelits, but this frame is one die and it has some awesome embossing details on it. Love. And I also love the other dies in the set… they're perfect for all you scrapbookers!


For this card, I stamped the tree three times without re-inking. You get this great variation of color with only one ink, plus a really nice dimensional effect. And of course I had to add some glitter "snow" to the trees - What's Christmas without some bling?? :) It's hard to see in the photo, but it's really pretty in real life!

Thanks for stopping by today. I hope you and all your family and friends have a beautiful and merry Christmas, and I wish you all the best in the coming year! Enjoy your holiday and…

Happy Stampin'! :)

Sunday, December 15, 2013

Quick Hostess Gift Enclosures

Hey there! Happy 10 Days Until Christmas! :) Are you ready? Well I've got a quick and simple last-minute card project idea for you today.


My social calendar has been busier than ever before in my life this month - I've never had so many Christmas parties and events! And with party season upon us, sometimes what you're looking for is a holiday themed card or tag that doesn't actually say Merry Christmas. So I decided to create a super simple 3x3 Christmasy thank you card.


These would be great to put with a hostess gift. Perfect if you're traveling and staying at someone's house and want to leave a little gift behind. Or to put with a teacher or neighbor gift.


I took my cues from the Season of Style DSP stack - $6.95 for 48 double-sided sheets! It's so perfect for projects like this. The color palette is a total no-brainer, and it's super cute… Old Olive, Cherry Cobbler, Baked Brown Sugar, Crumb Cake, and Whisper White.


I love the combo of Whisper White ink on Crumb Cake, and it goes so well with this color scheme. The snowflake stamp is from Festive Flurries, and the thank you sentiment is from Regarding Dahlias. It's stamped in Early Espresso.

So I hope this project gives you some ideas for your last-minute holiday crafting needs. Have a great week!

Happy Stampin'! :)


Snowflake Thank You 3x3 Supplies

Monday, December 9, 2013

Mixed Metallic Christmas Card

I'm definitely not a rebel - not in terms of fashion, the food I try, or the activities I'm drawn to. But I have always loved mixed metallics, which, once upon a time, were a big faux pas! Thankfully, the rest of the world has come around to my way of thinking (lol) and mixed metallics are super trendy :) And what better theme for a simple and very elegant Christmas card?


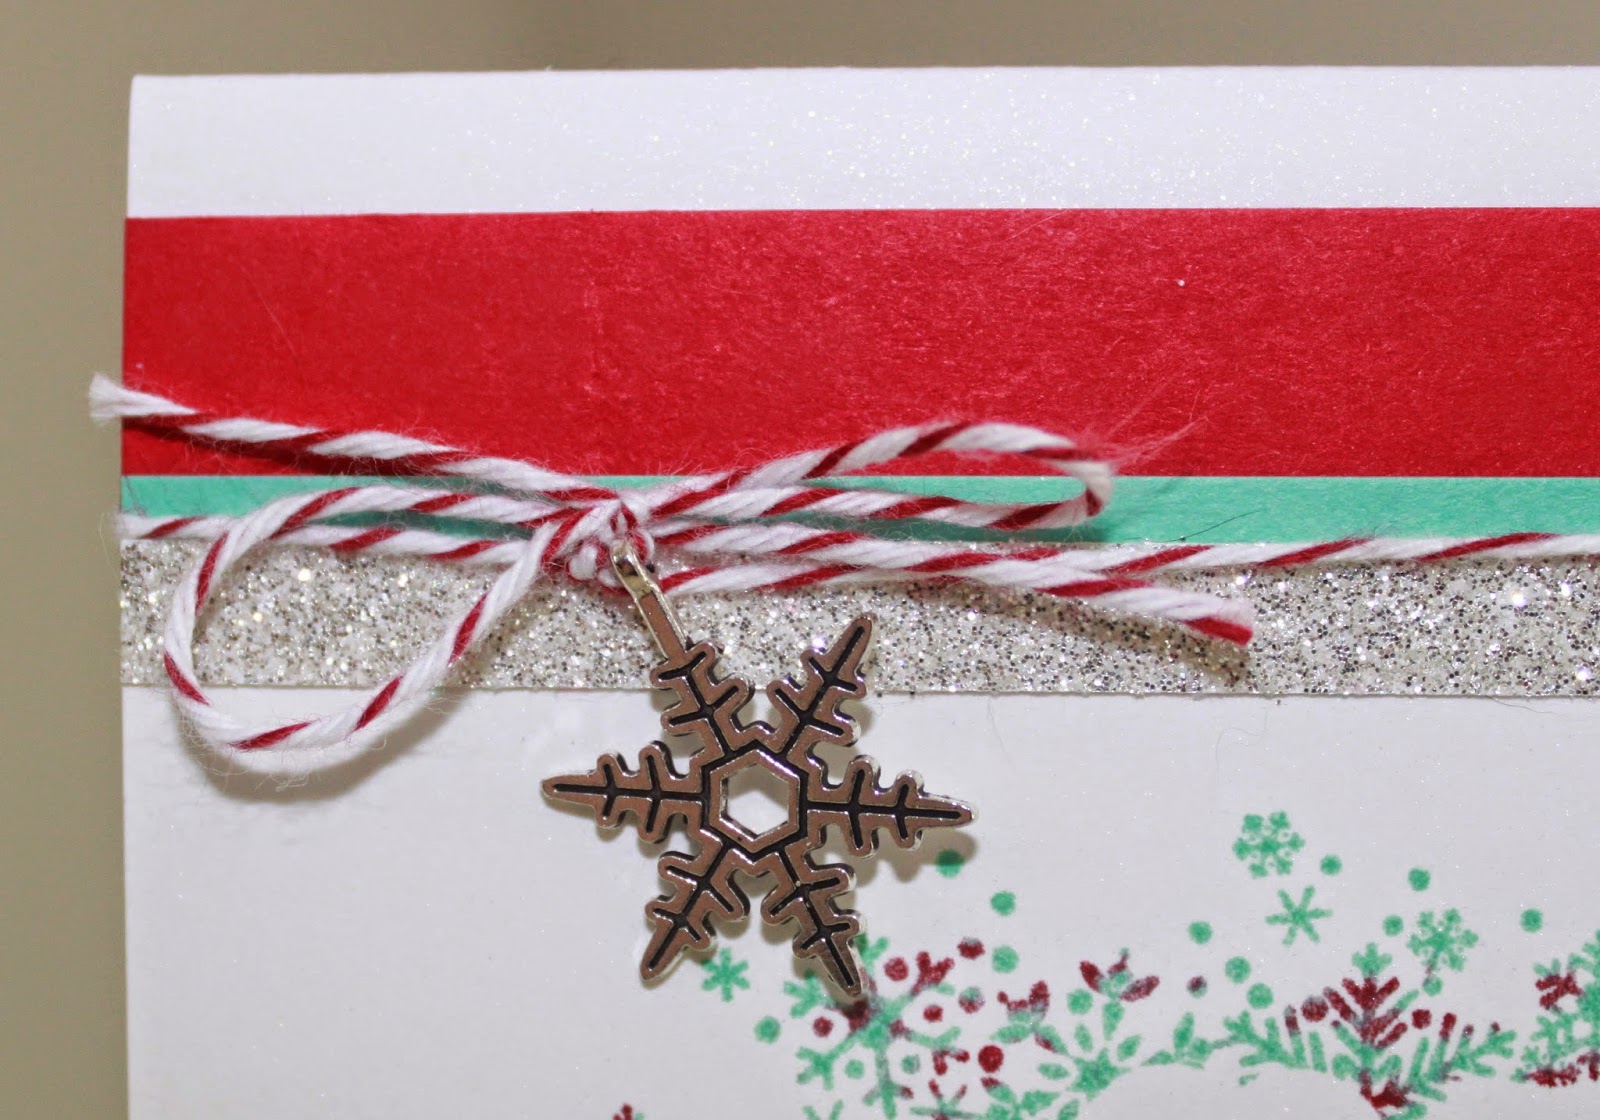
This is actually the Christmas card I made to send to my downline. And I 
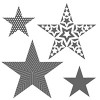
love how it came out. I pulled out all the metallic stuff I could find… Gold Embossing Powder, Silver Embossing Powder, Champagne Glimmer Paper, and Silver Glimmer Paper. So then I had Christmas and metallic, and the obvious choice was… of course! Stars! I just randomly stamped the stars from Simply Stars randomly all over a Very Vanilla panel. The easiest way to get multi-colored heat embossed images? Stamp a bunch in Versamark, then sprinkle on one color of embossing powder. Tap of the excess really well. Then stamp a bunch more, sprinkle on the next color, tap the excess really well. Want more different colors? Well… you get the drill. Then you can heat emboss all at once - No risk of burning previously embossed images when you go back in to emboss a second color!


Here you can see the great shine on this card. Love it! I chose to pair all these metallics with Crumb Cake and Linen Thread because the combo of metallics and rustic is one of my favorites.

(P.S. The sentiment on this set is from a photopolymer set that sold out faster than Stampin' Up! had expected and is sadly no longer available. But, the small star punch I used, which is from the 2012 Holiday Catalog - is on sale!)

Thanks for stopping by today. Have a great week!

Happy Stampin'! :)


Mixed Metallic Christmas Card Supplies