Showing posts with label challenge. Show all posts

Monday, September 1, 2014

CCC#043: September Monthly Challenge - Primary Colors


CCC#043: September Monthly Challenge
Primary Colors

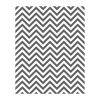
It's September, and we all know what that means... Back to School! So this month's challenge is inspired by Primary Colors. Think crayons, construction paper, lunch boxes, playground equipment, new sneakers... And make a project inspired by that! And here's a little inspiration photo to get your creative juices flowing even more.


I decided to make a card for this challenge. I will admit, I was more inspired by the back to school theme, and the inspiration photo above. So let me just say that, while I know that primary colors are only blue, red, and yellow, I chose to go with more of a rainbow look, like in the photo.


I was inspired by a card in the recent issue of our demonstrator magazine where they trimmed down one of the dies from the Homemade Holiday Framelits to make arrows. I decided to trim the die cut a little bit further, and make pencils!


I colored the "wood" part of the pencil with one of the Skin Color Blendabilities markers, and drew on the "lead" with a black marker. The colored part is cut with the same die, and then I used the smallest of the Starburst Framelits dies to cut the little zig zag parts at the top. The lines are stamped with one of the stamps from a great new border set called Draw the Line. The stars are punched from the Confetti Star Punch - one of my faves from the Holiday Catalog.

I was thinking this card would be cute to give to a teacher, so I chose the sentiment from one of the new hostess stamp sets. It would maybe be a little more relevant for the end of the school year, but I still thought it was fitting.

Now, make sure you head over to Catherine and Cathy Create to check out the other challenge projects. If you want to play along, make sure you link up your project, because you could win Stampin' Up! goodies! :)

Happy Stampin'! :)

Thursday, August 7, 2014

CCC#041: August Card Challenge - Happy Birthday!


August 2014 Challenge
Happy Birthday, CCC! :-D

I can't believe it! Catherine & Cathy Create is celebrating it's First Birthday! I have been so honored to be part of the Design Team, and I've had such fun with the challenges. I hope you have too! So, of course, this month's card challenge is all about birthday cards. I rode with the first birthday theme too, and chose to make a birthday card that would be great for your favorite kiddo!


I love this little Kind Koala stamp! It's a single wood-mount stamp. So cute! I modified the image a little for this card. The koala is holding a flower, and there's a sentiment around him, but I didn't want to use those portions of the image. I stamped the koala on watercolor paper and colored him using Smoky Slate, Basic Gray, and Blushing Bride inks and a water brush


I also used Pistachio Pudding, Tangelo Twist, and Crushed Curry inks with the Gorgeous Grunge stamp set to create the look of confetti. This koala sure knows how to party!


Instead of the flower, I decided to make some fun birthday banners for the koala to hold. I used a piece of Confetti Celebration DSP, and a cute sentiment from Something to Say

That's it for me for this challenge. But make sure you head on over to Catherine & Cathy Create to see the other Design Team members' cards. Link up your own birthday card and you might win a prize!

Happy Stampin'! :)

Monday, August 4, 2014

One Stamp, Four Ways: Shabby Vintage Get Well Card

Hey - Remember that series I started a while back when I made 4 different cards with one stamp set? Well, I've got number 3 for you today! This one was a request from the guys at the Provincetown Department of Public Works. :-D One of their employees, a fellow stamper and friend of mine, had to have some surgery done. It's funny, because when they need a card for something like this, they usually ask her to make one. But she couldn't very well make her own get well card! LOL :)

Anyhow, she and I have very different styles. I love beachy sherbet-y colors, she loves jewel tones. I like clean and graphic cards, she's into distressing and sponging. So I really tried to work outside my comfort zone on this one. Here's the result...


I pulled out some colors I don't usually use on this one... including 4 out of the 5 new In Colors! The purple flower is Wisteria Wonder and Blackberry Bliss, the blue flower is Marina Mist and Lost Lagoon, the yellow flower is Daffodil Delight and Hello Honey, and the leaves are Old Olive and Mossy Meadow. This card really shows off the two-step stamping that the Flower Patch set is designed for... There are so many ways you can combine and layer the different images to create unique flowers!

I chose to stamp the flowers on a piece of the new Typeset DSP. I am madly in love with this stuff! The designs are gorgeous - text, numbers, ledgers, maps... and it's printed on this lightweight paper so it really behaves like vintage book pages! Hooray for not having to rip up yardsale books anymore! :) I punched the edge with another of my new favorites - the Spiral Border Punch. Then I distressed the whole piece with the Stampin' Distress Tool, and crumpled the edges a little with my fingers.


Other supplies I used on this card... The Hello Honey and Lost Lagoon DSP's are from the Moonlight DSP Stack. The sentiment is from A Dozen Thoughts, stamped in black on Hello Honey cardstock. I used a Very Vintage button and linen thread to create the embellishment on the sentiment. The cardstock layers are Lost Lagoon and Blackberry Bliss.

If you missed my first two cards, make sure you go check them out. I made an almost-one-layer sympathy card and a super fun birthday card I hope you're getting inspired to use your stamps in new and different ways! I've got one more card to share with you, so stay tuned.

Happy Stampin'! :)

Saturday, August 2, 2014

Social Media Challenge Reject

Yesterday I shared my social media inspired card for the Catherine & Cathy Create August challenge. What I didn't tell you was that it was actually the second card I'd made for the challenge. :) Wanna see my first attempt? I guess I shouldn't really call it a "reject" because I still think it came out great, but I ended up deciding that I didn't quite use enough social media influence. Check it out...


The original idea behind this card was the juxtaposition between the old-fashioned typewriter and the modern hashtag sentiment. I still think it looks cool on the card, but I chose to make the other card to play up the social media aspect of the challenge. 


The color combination of Blackberry Bliss and Hello Honey was taken from the Moonlight DSP Stack (which also includes Basic Gray, Lost Lagoon, and Sahara Sand), which I also used on the little flags at the bottom of the card. The sentiment is from #hello and the adorable little paperclip is from the Basics Hodgepodge Clips assortment (love it!)


I colored this super cute typewriter (it's from a set called Tap Tap Tap, by the way) with Blackberry Bliss ink and an aqua painter. So cute! I popped it up on a slightly crooked piece of my new favorite thing in the entire world: Typeset DSP. I punched the edge with the Spiral Border Punch (my other new fave!) and tied on some black bakers' twine. Oh, and those awesome polka dots on the Hello Honey panel? That's the Large Polka Dot embossing folder. Love that texture!

Happy Stampin'! :)

Monday, July 7, 2014

CCC#038: July Cards Challenge - Green Planet


CCC#037: July 2014 Cards Challenge
Green Planet
Inspired by Earth

OK, friends, this month's challenge is to make a card inspired by planet Earth. Now I'll admit, this one really had me stumped for a while. I kept pouring over my stamp collection thinking... What direction do I want to go with this? Maps? Blue and green? When I couldn't make up my mind, and no stamps were jumping out at me, I decided this challenge called for one thing: Custom made stamps! :)


Isn't it amazing that we can carve our own stamps now?! Stampin' Up! just thinks of everything! I've done my fair share of linoleum block printing in my life, but the Undefined stamp carving kit has sat on my shelf for almost a year now (it was introduced at Convention last year, remember?) and I could never decide what I wanted to make with it. So glad I still had it there ready and waiting when I decided what to do for this project!


I decided to do my stamping on this paper from the Typeset DSP collection, because it looks like newspaper and, to me, that fits with the recycling part of the message. I kept the rest of the card very simple - a simple spiral border, linen thread, and I sponged the card base using the polka dots stencil from the new Dots and Stripes Decorative Masks.

As I was stamping these images, I was thinking about how nice they'd look just on a simple one-layer notecard. So I decided to give that a try too! But of course, I couldn't just leave it at that... :)


I ended up cutting about an inch off the bottom of the card, and then I adhered the DSP to the inside so it peeks out the bottom. And I also added some white bakers' twine.


I hope you enjoyed these cards and that you're excited to give the Undefined stamp carving kit a try! Let me tell you, this kit is amazing! Like I said, I've done linoleum blocks before with the hard linoleum and the soft flexible kind. The rubber in the Undefined kit blows them both out of the water! It cuts like buttah! I highly recommend you give it a try! :)


(P.S. These aren't the blocks that come in the kit for you to mount your stamps on - but there are 4 blocks that are included. My dad made these for me because my stamps happened to be a little too big for the small blocks and too small for the large block.)

Head on over to Cathy and Catherine Create to check out the other DT members' cards. And don't forget to link up your card if you play along with the challenge - you could win an awesome prize!

Happy Stampin'! :)


Tuesday, July 1, 2014

CCC#037: July 2014 Challenge - National Pride

CCC#037: July 2014 Monthly Challenge
National Pride

This month's challenge from Catherine and Cathy Create is to make any project inspired by your country's national colors. A lot of us are celebrating Canada Day and the 4th of July, so this is perfect timing! Though, I have to say this one wasn't much of a challenge for me since 95% of my recent projects have been red, white, and blue! :-D

So as I told you before, I've been completely addicted to the Sea Street stamp set and matching Maritime DSP collection... which just happens to be red, white, and blue! What I love about the Sea Street set is that it's so much more versatile than it may appear at first glance. Sure, there are cutesy smiling sea creatures that are probably most appropriate for projects for kids. But the other images in the set are perfect for creating a totally on-trend and very sophisticated preppy nautical look. That was what inspired my project for this challenge.


I decided to put together a complete stationery set with everything you need to send adorable notes right in one box. Since I used the preppy nautical theme, this set is very grown-up, but would also be completely appropriate for a child off to sleep-away camp. :)


I used Stampin' Up!'s white notecards and envelopes to quickly and easily create a set of 6 clean and simple notecards. I stamped the anchor and rope images from Sea Street and the hello sentiment from A Dozen Thoughts in Real Red, Coastal Cabana, and Night of Navy inks.


The notecards come come with envelopes, but I wanted to dress up the cards a little so I made my own envelopes out of the Maritime DSP and the envelope punch board. Quick, easy, and cute!


Since the DSP envelopes don't have any sealer on them, I thought it would be nice to stick some coordinating stickers into the kit. These are just some white yardsale price stickers I had hanging around, but the anchor stamp fits perfectly on them! I also found some large mailing label stickers, white I decide to cut in half and stamp to coordinate too. (The "to" stamp is from an old Christmas set, by the way.)


Here's what it looks like when the whole set is put together. So cute and so sophisticated! I stamped on the label (with a retired alpha set - sorry!) but you could just as easily hand write your recipient's name. Or you could write a whole address on the label - it's big enough - and you could actually put this through the mail! (I'd seal the envelope up with more than just the little sticker if I was going to mail it.)

I did include a coordinating pen, because I wanted the kit to have everything you'd need to write and send a note. I wanted to put a piece of DSP inside the clear barrel of the pen, but this particular pen is just too skinny, and I couldn't find the mini version of the Pentel R.S.V.P. pens that work so well for this. Oh well, the pen still matches all by itself!

So that's it for me! Hope you enjoyed this project and you've been inspired to play along with this challenge and make a project with your country's national colors? Are they the same as mine? :) If you do make a project, make sure you link it up on Catherine and Cathy Create - and while you're there, check out the other DT members' projects.

Happy Stampin'! :)

Sunday, June 1, 2014

CCC#034: June 2014 Monthly Challenge - Pack Your Bags!


June is bustin' out all over! (Hubby and I recently saw Carousel at our favorite community theater last weekend, and I have had that song, and the clambake song stuck in my head since then!) But seriously, it sure doesn't feel like June around here... it's been so cold! I'm talking temps in the low 50s every day! It's a struggle for me not to turn the heat on in the evening. But we've had some sunny days, and the lawn's needed mowing once, so we know summer will be here eventually.

This month's challenge from Catherine and Cathy Create is "Pack Your Bags" - any project inspired by travel! I'll admit, I struggled with this one a little. I got stuck on 'but I don't have any planes, trains, or automobiles stamps!' for a while. But that's what these challenges are all about... getting us to flex our creative muscles and think outside the box! So here's what I came up with...


I was inspired by a few things for this project. My little brother is moving to Wisconsin next month - OK, so it's not exactly a voyage, but it definitely put the banner idea into my head. :) I thought the nautical color scheme spoke to the old-fashioned cross-Atlantic ocean liner idea. Plus, I really wanted to use this amazing new DSP from the new catalog that has adorable nautical motifs... I adore it and totally want to wallpaper my entire house with it! Take a closer look!


Look at the anchors and knots! LOVE! The collection is called Maritime. It's got some cutesy images like happy octopi, but then there are a lot of really sophisticated preppy patterns, like the stripes, anchors, and knots that I used in this project.


I used the stencils from the Build a Banner Kit on banners that I cut from Coastal Cabana, Real Red, and Night of Navy cardstock. Remember the Build a Banner Kit from the Holiday Catalog? It'll be back in the new catalog - TOMORROW! :) - plus a couple other awesome banner kits! I used the stencils to sponge on tone-on-tone polka dots and white emboss the letters. It all came together super easily and quickly! With the stencils, you can make it say anything you need. Plus, pick any color combination and DSP that works with your occasion. Cheap and cheerful, just the way I like it! :)


Now go check out Catherine and Cathy Create to see what the rest of the Design Team made. You're gonna love it! Plus, link up your travel-inspired project, and you might win a prize!

Happy Travels... er, um, I mean Stampin'! :)

Thursday, May 1, 2014

CCC#031: May Challenge: Starlight, Star Bright


Welcome to the Catherine and Cathy Create monthly challenge for May 2014: Starlight, Star Bright. The challenge this month? Don't put a bird on it - Put a star on it! :)

I have a couple sets of cards that have been kicking around that I need to give to a few girls who missed a class that they had already paid for. So I decided to use this as a good reason to wrap them up all fancy-like. ;) Check it out...


I used my brayer to custom-color a piece of the rectangular Crêped Filter Paper with Strawberry Slush ink. Perfect coordination with my awesome emboss resist tag!


I used clear and white embossing powder over Coastal Cabana cardstock. The star stamp is from Perfect Pennants, by the way. Then I inked over the embossing with Night of Navy ink. Check out the video below for the how-to!  (You can also find the video on my YouTube channel, if you prefer.)


I'm trying to get out of my comfort zone a little and try out the layering trend that is all over the place lately! So I decided to busy things up a little with a splash of pink, a gold embossed monogram, and some little pieces of Sequin Trim and (retired) Coastal Cabana Ruffled Stretch Trim. (I just used a mini stapler to attach them to the tag.)

So, that's it from me! Go check out the other design team member's amazing projects on Catherine and Cathy Create! And don't forget - play along, link up your project, and you might win! :)

Oh yeah, and here's that video I promised you...


Happy Stampin'! :)

Monday, April 7, 2014

CCC#029: April Cards Challenge - Blue Skies and Yellow Highs


The April Cards Challenge from Catherine and Cathy Create is called Blue Skies and Yellow Highs! Inspired by longer days and spring weather, the challenge is simple: Use blue and yellow on a card.

Today could not be a more perfect day to be writing the post for this particular challenge! We have had sunny, warm weather two days in a row, which is so wonderful after the bitter cold and snowy winter we had here on ol' Cape Cod. We've had the windows open, laundry on the line, and time to spend outside! :)


This is a simple color challenge, yes, but I often find that the more open-ended the challenge, the more difficulty I have getting started. I was browsing Pinterest when I found this picture...

    
... and I was immediately inspired! I got the idea of using multiple sizes of circles from the mobile hanging above the chair. I love the pale color scheme, as well as the pops of gray. And chevrons! :)

I used Jennifer McGuire's "iron off embossing" technique for the background. It's hard to see in the picture but it has a great matte finish and allowed me to stamp Gorgeous Grunge over top of the emboss-resist background. The large polka dot and stripe circles are from the stamp set from February's Paper Pumpkin kit.

Thanks for stopping by today. Now head on over to Catherine and Cathy Create to see what the other DT members made! Link to your yellow and blue card and you could win a prize from Stampin' Up! Have a great week!

Happy Stampin'! :)


Blue and Yellow Happy Day Card Supplies