Showing posts with label gift wrap. Show all posts

Sunday, July 27, 2014

Start-to-Finish Sunday #40 - Stamped Muslin Bag

Here's a project I made for my sister-in-law's birthday a few weeks back. I had found this adorable personalized wine bottle coozie online months ago, and I wanted to put a little something with it - besides a bottle of wine, of course! :) And I wanted to make some custom packaging to match perfectly.


Cute, right? The colors don't match perfectly, but it still coordinates great! I love these Mini Muslin Bags that Stampin' Up! sells now. They're so cute and so versatile. And they're made of a great fabric that's perfect for stamping on. Want some tips? Check out my video below, or over on my YouTube channel.


Happy Stampin'! :)

Thursday, May 1, 2014

CCC#031: May Challenge: Starlight, Star Bright


Welcome to the Catherine and Cathy Create monthly challenge for May 2014: Starlight, Star Bright. The challenge this month? Don't put a bird on it - Put a star on it! :)

I have a couple sets of cards that have been kicking around that I need to give to a few girls who missed a class that they had already paid for. So I decided to use this as a good reason to wrap them up all fancy-like. ;) Check it out...


I used my brayer to custom-color a piece of the rectangular Crêped Filter Paper with Strawberry Slush ink. Perfect coordination with my awesome emboss resist tag!


I used clear and white embossing powder over Coastal Cabana cardstock. The star stamp is from Perfect Pennants, by the way. Then I inked over the embossing with Night of Navy ink. Check out the video below for the how-to!  (You can also find the video on my YouTube channel, if you prefer.)


I'm trying to get out of my comfort zone a little and try out the layering trend that is all over the place lately! So I decided to busy things up a little with a splash of pink, a gold embossed monogram, and some little pieces of Sequin Trim and (retired) Coastal Cabana Ruffled Stretch Trim. (I just used a mini stapler to attach them to the tag.)

So, that's it from me! Go check out the other design team member's amazing projects on Catherine and Cathy Create! And don't forget - play along, link up your project, and you might win! :)

Oh yeah, and here's that video I promised you...


Happy Stampin'! :)

Tuesday, April 1, 2014

CCC #028: April Challenge - Fresh Beginnings Photo Challenge


Happy April! No foolin' - It's time for another Catherine and Cathy Create Monthly Challenge! :) This month we have a spring inspired photo challenge. It can be anything inspired by this photo...


As I've said in the past, I like to use the monthly group challenge to do something other than a card. So far, it's usually been some sort of 3D item, and this month is no different. Check out my take on the photo...


I decided to make a cute little treat pouch with a coordinating tag. I used one of the mini muslin bags (love these!) - I'd been wanting to try heat embossing on them for ages now!


I cut a square of cardboard to fit inside the bag so the ink wouldn't go through to the back side of the bag, and to help it lie flat. I used blue painter's tape to mask off stripes across the front of the bag, and then I generously pressed my Versamark pad all over the bag. I removed the tape quickly, then sprinkled Pool Party embossing powder over the whole thing. Then I just heat set it like normal! (Wait until you're completely done with the process before you remove the cardstock from inside the bag.) Eh voilà! An adorable striped muslin bag with great texture. I also replaced the plain drawstring with Primrose Petals ribbon to coordinate.


The tag is stamped with the Simple Stems stamp set. The sentiment is from Six Sided Sampler. I used a new-to-me technique - "the filter paper technique" - to get some great texture on the stamped image.  Here's a close-up of the tag.


Isn't that pretty? It sort of looks like the Mulberry Paper that Stampin' Up! used to sell. I'll be doing a video on this technique soon. :)

So that's it from me for today. Make sure you stop by Catherine and Cathy Create to check out all the inspiration from the Design Team... This is one not to be missed, trust me! :) If you're inspired to play along, make sure you link up your project because you might win some Stampin' Up! goodies! Enjoy the rest of your week.

Happy Stampin'! :)


Supply List

Sunday, December 1, 2013

CCC#016: 'Tis the Season


CCC#016: December 2013 Challenge
'Tis the Season


For this month's challenge from Catherine and Cathy Create, anything goes - as long as it's Christmas! :) I wanted to share a super simple gift packaging option. I am obsessed with the Tag a Box bundle! I mean, how cute are these little kraft boxes?! They measure 6-7/8" x 2-1/8" x 2-1/2" and come with a plastic sleeve that slides over the box. Adorable and effortless - perfect for the holidays! You can get the boxes separately (8 of them for $6.95!), or you can get the bundle with the boxes and the Accessories Kit and save. The accessories kit includes a ton of tags that are perfect for layering, plus baker's twine, dimensionals, and adorable mini clothespins. I used the bundle on this project.


You could leave the box as-is and let your cute gift show through the clear sleeve - some homemade cookies maybe? :) Or you can create a little cardstock topper like I did here. I used Cherry Cobbler cardstock and stamped the snowflakes in Cherry Cobbler ink. The cardstock is cut to 6-7/8" x 4-3/8" and it's scored at 1" and 3-3/8" on the short side. Just place it over the box and slide the clear sleeve over the whole thing. SO easy!


I created a belly band with the Season of Style DPS stack, then used one of the tags from the accessories kit. I tied Cherry Cobbler baker's twine around the box, and clipped the tag on with one of the mini clothespins. Ca-ute! :)

Please visit Catherine and Cathy Create to see what the other design team members have made. You will love their Christmas inspiration! And if you play along with the challenge, and link up your project, you might win some Stampin' Up! goodies!

Thanks for stopping by. Happy Stampin'! :)


Joyful Tidings Box Supplies


Monday, October 21, 2013

one martini, two martini, three martini...

... Floor! Ha ha! ;)

Anyway... today is the birthday of one of my oldest and dearest friends. Well, actually, she's really one of my youngest friends - LOL!  She and I are the same age for 5 whole days every year. :) But again, I digress... (Geez. I'm in some kinda funny mood today, huh?) She's a fan of martinis and other cocktails - there's always a very impressive bar at her parties that I never know what do to with! For a while now I've been wanting to make cocktail onions, so my hubby and I finally got around to doing that, and I decided to put together a little martini-themed birthday present. Homemade cocktail onions, not homemade vermouth-soaked olives, and a gift card to a local liquor store. So obviously I had to make a matching tag, right? :)


You all know how I have come to feel about tags lately, especially where cute and coordinated, but quick gift wrapping is concerned! Tags are totally a crafty gal's best friend :)


I broke out the Happy Hour set for this one. Love this set! I decided to keep things simple and let the stamping really shine.


I used Basic Gray and Smoky Slate markers to stamp the martinis, and Crumb Cake, Old Olive, and Real Red markers on the olives. Then I stamped the two sentiments in Basic Gray, adding in a pop of yellow with the Daffodil Delight banner. I really like the mix of the primary colors here, especially with the royal blue bag.


This little touch I can't take credit for. I saw it somewhere recently - don't remmeber if it was from a fellow demonstrator or one of the Stampin' Up! concept artists. Either way, I think it's totally brilliant! This is the large ticket from the Ticket Duo Punch. Doesn't it just create the cutest little tag topper? Awesome. :)

Thanks for stopping by today. Have a great Monday.

Happy Stampin'! :)

Saturday, August 3, 2013

Christmas in July Week - Day Six: Snowflake Envelope Gift Bag

Day Six? Huh? Yup, you read that right! :) Originally I had planned for Christmas in July Week to go Monday through Friday, with 5 projects in total. But then I decided to kick start things early last Sunday. And I was already planning on a bonus project for this week's Start-to-Finish Sunday video, so then I figured I might as well fill in the empty day with another project! So instead of 5, you get 8 Christmas projects in total. :)

Since I've mostly done cards so far, I wanted to share another gift wrap idea. There were a lot of things I wanted to combine into this project. The final project, I think, might be a little over-the-top, but I still like it.


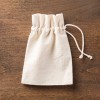
This is one of my favorite DIY packaging techniques - making a gift bag out of an envelope. Yes! It's so easy and comes out so cute every time! (See my 
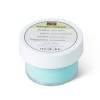
video tutorial on YouTube for instructions.) I used two of my current favorite colors, Pistachio Pudding and Pool Party. Such a pretty combo that can go from summer right to winter! I also added pops of silver with the new Silver Metallic Encore Ink (#132142) from the Holiday Catalog. (It's also available in Gold, #132141.)


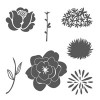
I made the tag with the Festive Flurry stamp set (#131778 wood/#131781 clear) and matching Framelits (#132193). Head's up - Savings Alert! These stamps and Framelits also come together in a bundle at a 15% savings! (#133284 wood/#133285 clear) To see how I made the dimensional layered tag check out this video from Stampin' Up!


I also used a new die from the Holiday Catalog - this is definitely in my Top 3 Faves in the whole catalog! It's the Gift Bow Bigz Die (#129977) and it makes two sizes of these amazing paper bows. This is the smaller one. I'll do a video soon showing how to put them together, but it's really quite easy. This style of bow has been everywhere lately, and this die makes it so easy to create the perfect one. Just check out the dimension on this beauty!


WOW! I'm pretty sure one of these is going to be on everything I give this Christmas. :) Love, LOVE this die!

So, stop on back tomorrow for my Christmas in July (...ehrm, August. Yeah, whatever - LOL!) edition of Start-to-Finish Sunday. I'm planning to demonstrate another fun die cutting technique. Until then...

Happy Stampin'! :)