Showing posts with label 2013-2014 Catalog. Show all posts

Thursday, May 1, 2014

CCC#031: May Challenge: Starlight, Star Bright


Welcome to the Catherine and Cathy Create monthly challenge for May 2014: Starlight, Star Bright. The challenge this month? Don't put a bird on it - Put a star on it! :)

I have a couple sets of cards that have been kicking around that I need to give to a few girls who missed a class that they had already paid for. So I decided to use this as a good reason to wrap them up all fancy-like. ;) Check it out...


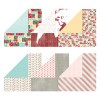
I used my brayer to custom-color a piece of the rectangular Crêped Filter Paper with Strawberry Slush ink. Perfect coordination with my awesome emboss resist tag!


I used clear and white embossing powder over Coastal Cabana cardstock. The star stamp is from Perfect Pennants, by the way. Then I inked over the embossing with Night of Navy ink. Check out the video below for the how-to!  (You can also find the video on my YouTube channel, if you prefer.)


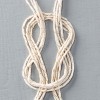
I'm trying to get out of my comfort zone a little and try out the layering trend that is all over the place lately! So I decided to busy things up a little with a splash of pink, a gold embossed monogram, and some little pieces of Sequin Trim and (retired) Coastal Cabana Ruffled Stretch Trim. (I just used a mini stapler to attach them to the tag.)

So, that's it from me! Go check out the other design team member's amazing projects on Catherine and Cathy Create! And don't forget - play along, link up your project, and you might win! :)

Oh yeah, and here's that video I promised you...


Happy Stampin'! :)

Saturday, April 26, 2014

Retirement Party Part Three - And a Technique Video!


This is a technique I learned a while back from a fellow demonstrator Jackie Hart. It's called the "filter paper technique" - I've also seem a similar technique that's been called the "tissue paper technique." I like this better, though, because it uses the Creped Filter Paper from Stampin' Up! which holds up a lot better than tissue paper.


The amazing texture that results from this technique is hard to capture in a photo, but trust me, you will love it! It's like you stamped on beautiful artisan handmade paper! And it's so easy! Check out my how-to video below, or over on my YouTube channel.


Note that I used a few retiring products on this card that - as of when I'm writing this post! - are still available... but only while supplies last! I used the En Français background stamp (which I just finally bought myself and now it's retiring!), the Scallop Trim Border Punch, and Raspberry Ripple ink (the cardstock is no longer available).

Happy Stampin'! :)

Technique Video: Using the Hexagon Hive Thinlit Die as a Stencil

Hey there! Today I have another quick video tutorial to share with you. I made a card for a recent class where I used the Hexagon Hive Thinlit die to create a stencil. I used sponging to get a really fun and totally on-trend ombre effect. Check it out!


Pretty simple card, but what a great look! I also used Gorgeous Grunge to add even more texture to my card front. The sentiment and the label I stamped it on are from the Chalk Talk stamp set and dies. (Get them as a bundle to save 15%!) Easy-peasy! :)

Check out the video below, or over on my YouTube channel. Have fun with this technique! What other dies can you use as a stencil?


Happy Stampin'! :)

Friday, April 25, 2014

Retirement Party! Part Two


This is a card I made a few weeks ago for a class that I wanted to teach emboss resist in. I hadn't got around to sharing it yet, and now a bunch of the products I used are retiring! :( Let me give you the low-down...

The flowers are from Simple Stems, which is in the Occasions Catalog and will be available until May 31st. But if you like them, get your order in TONIGHT for FREE SHIPPING! I clear embossed them onto Whisper White Cardstock, then sponged on Summer Starfruit, Pistachio Pudding, and Baked Brown Sugar inks. The embossed areas resist the ink, leaving the white showing through where you stamped! Awesome! :)

The retiring products I used on this card that are still available (as of when I'm writing this post) are...
- Field Flowers (for the sentiment) - only wood-mount is left, and remember, these could disappear at any moment!
- Summer Starfruit ink
- Sponge Daubers (Stampin' Up! is the only place you can buy 12 of these at a time! $10.95 - what a deal!)
- Scallop Trim Border Punch

Get 'em while you can if you're interested! Place an order on my website or email me. Remember! FREE SHIPPING ENDS TONIGHT!

Happy Stampin'! :)

Retirement Party: Lacy and Lovely


Let's take a minute to celebrate Lacy and Lovely! 


This set is so pretty! I love it for super quick CAS cards, or for beginning stampers. Or step it up and try it out with a cool technique like emboss resist! :) I went the quick-and-easy route on the card I'm sharing with you today. The images in this set make awesome stamped backgrounds! I used Rich Razzleberry, Old Olive, and Summer Starfruit on this card. (NOTE: Summer Starfruit is a retiring color, but as of the writing of this post, Summer Starfruit ink, as well as the Modern Medley DSP I used on this card, which is also retiring, are still available! Sadly, the Old Olive ribbon is sold out.)

Want to know my favorite thing about this set, though? The greetings! :) You know how i love mixed fonts! LOL. But seriously. These sentiments really have the perfect balance of every element... Not too feminine or masculine... They're not really large or long so they fit almost everywhere, whether you need a horizontal or a vertical sentiment... I definitely have reached for these greetings a lot! (In case you're wondering about the sentiment I used on this card, though, it's from A Dozen Thoughts, which is not retiring. I love it because it's got great general sentiments that are just a little bit more unique than the standards without being so quirky you never know when to use them!)

Remember: TODAY (Friday, April 25th) is the LAST DAY to get FREE (standard) SHIPPING ON ALL ORDERS! Go to my website or email me ASAP to place your order!

Happy Stampin'! :)

Sunday, March 16, 2014

Start-to-Finish Sunday #36 - Starburst Sayings Thank You Card

I'm back with a video! Can you believe it?! :) A day on the sofa with a stuffy nose gave me the perfect opportunity to learn the newest version of iMovie and get this video edited. Believe me, I wish I could breathe, but I'm glad I'm finally getting a video posted!


This is a card I made for a recent class. Pretty simple, using just one stamp set and a background stamp. The color palette was directly inspired by the I Am Me DSP that I used.


I also took advantage of some of the awesome embellishments in the Occasions Catalog. Let me tell you... Stampin' Up! has really stepped up their embellishments! They are so cute and perfectly on-trend. I used the gold sequins, gold baker's twine, and a super cute wood veneer heart. LOVE! :)

Check out the video below, or over on my YouTube channel. Enjoy!


Thanks for stopping by. Have a good week!

Happy Stampin'! :)


Starburst Sayings Thank You Card Supplies


Tuesday, January 7, 2014

CCC#020: Cards Challenge - Birthday Bonanza!


January 2014 Cards Challenge: Birthday Bonanza!

Now that Christmas is over, it's time to replenish our stocks of year-round cards :) Hence this month's card challenge: Birthday cards. I decided to use the new Retro Fresh DSP collection again and make a sort-of masculine, sort-of kid card. So… for a young boy maybe? LOL :) Let's just say it's not overtly feminine. 


Super super simple! One DSP collection, two stamp sets. A little bit of fussy cutting (stars) and some clear heat embossing (Tangerine Tango banner), but otherwise this card came together really easily. 

Now get on over to Catherine and Cathy Create to check out the other DT Members' cards! Go get inspired, then create your own birthday card. Link it up to the challenge post and you might win a new stamp set! What are you waiting for!? :)

Happy Stampin'! :)


Make a Wish Card Supplies


Monday, December 23, 2013

Two Last-Minute Christmas Cards

Who's ready for Christmas?? :-D I'm *thisclose* to having everything ready… but I'm hosting this year so I still have a lot of cooking to do. But in the midst of all the hustle and bustle, I wanted to pop in and share two last-minute card ideas.


This one's super simple and you can pretty much make it with any supplies you have. Living on Cape Cod, I make a lot of beach themed things. But you can, of course, use any stamps you like in any color scheme you like. But the idea is super simple - stamp a repetitive pattern on a cardstock panel, add a little ribbon and a little DSP and you're good! I chose to tear the bottom of the DSP just to add a little interest. Also, in subsequent versions of this card, I used the 2-Way Glue Pen to add a little Dazzling Diamonds glitter to the centers of the sand dollars. Easy peasy! :)


This one shows a sneak peek at one of my favorite new Framelits collections from the upcoming Occasions Catalog. See that Polaroid-style frame? A while back, I showed you how to make something similar with the Squares Framelits, but this frame is one die and it has some awesome embossing details on it. Love. And I also love the other dies in the set… they're perfect for all you scrapbookers!


For this card, I stamped the tree three times without re-inking. You get this great variation of color with only one ink, plus a really nice dimensional effect. And of course I had to add some glitter "snow" to the trees - What's Christmas without some bling?? :) It's hard to see in the photo, but it's really pretty in real life!

Thanks for stopping by today. I hope you and all your family and friends have a beautiful and merry Christmas, and I wish you all the best in the coming year! Enjoy your holiday and…

Happy Stampin'! :)

Monday, December 9, 2013

Mixed Metallic Christmas Card

I'm definitely not a rebel - not in terms of fashion, the food I try, or the activities I'm drawn to. But I have always loved mixed metallics, which, once upon a time, were a big faux pas! Thankfully, the rest of the world has come around to my way of thinking (lol) and mixed metallics are super trendy :) And what better theme for a simple and very elegant Christmas card?


This is actually the Christmas card I made to send to my downline. And I love how it came out. I pulled out all the metallic stuff I could find… Gold Embossing Powder, Silver Embossing Powder, Champagne Glimmer Paper, and Silver Glimmer Paper. So then I had Christmas and metallic, and the obvious choice was… of course! Stars! I just randomly stamped the stars from Simply Stars randomly all over a Very Vanilla panel. The easiest way to get multi-colored heat embossed images? Stamp a bunch in Versamark, then sprinkle on one color of embossing powder. Tap of the excess really well. Then stamp a bunch more, sprinkle on the next color, tap the excess really well. Want more different colors? Well… you get the drill. Then you can heat emboss all at once - No risk of burning previously embossed images when you go back in to emboss a second color!


Here you can see the great shine on this card. Love it! I chose to pair all these metallics with Crumb Cake and Linen Thread because the combo of metallics and rustic is one of my favorites.

(P.S. The sentiment on this set is from a photopolymer set that sold out faster than Stampin' Up! had expected and is sadly no longer available. But, the small star punch I used, which is from the 2012 Holiday Catalog - is on sale!)

Thanks for stopping by today. Have a great week!

Happy Stampin'! :)


Mixed Metallic Christmas Card Supplies